
How to link Google Tag Manager, Webflow and PostHog without a headache
An exhaustive step-by-step guide for event-based analytics on your Webflow site using Google Tag Manager and PostHog

It's 2023 and I just started using Webflow for building landing pages. Have to admit, I had to do that way earlier.
My takeaway – it's a great tool when used in combination with Google Tag Manager and PostHog, but a setup can be a bit tricky. So, I laid it out below – step-by-step.
Background
I'm frequently testing various product ideas by driving traffic to quickly-hacked landing pages. My weapon of choice was Tilda. It's a simple tool that allows you to spin up a decently-looking page in an hour, but there isn't much in terms of customization.
Tilda's shortcomings
You can select from a range of pre-built blocks built by the team, combine them together and replace content. Most of the time it does the job, but sometimes they overlook things – e.g. you cannot track button clicks on most of decent-looking "Pricing" blocks. You can also make your own blocks, but it's not nearly as powerful as Figma.
On top of that, it's pretty hard to make it work with analytics. Yes, they track visitors, and yes, you can track custom events – but each button click can only be tracked as a view of special system-generated URL. This means a separate event for each button and a long analytics setup for high-resolution landing page analytics.
Why Webflow?
So, Tilda was not enough for me because of the looks and the time it took me to set up event tracking. I knew about Webflow for a long time and finally decided to try it last week.
I have to say I was not disappointed at all. There was most of things I wanted:
free plug & play component libraries
sync with Figma
ability to add custom code to the pages
Zapier/Activepieces integrations
good looks
I'm not a designer, so ability to create a decent-looking site that would not make it unnecessary hard about Google Tag Manager setup sold me on their paid plan completely.
Why Google Tag Manager?
Even though most of modern-day CMS systems allow you to link Google Analytics property by copypasting its number, that's not enough for me. There are several reasons:
I want to have Amplitude-grade analytics based on events, not pageviews, so GA is not an option in most cases
I want to send event data to multiple destinations on top of analytical tool – e.g. Twitter/LinkedIn/Google Ads accounts, Intercom user profiles or Telegram notifications built as Activepieces workflows
I hate waiting for developers to add 3-row event trackers to a page for weeks
For all of these, I prefer Google Tag Manager. Yes, it's more complicated than just using GA, but it gives me great flexibility and independence from engineers. With GTM, I can add any tools I want in minutes by copypasting the code. It is also very flexible, thanks to variables and ability to launch custom JS code.
Why PostHog?
Despite the usual product analytics suspects like Amplitude or Mixpanel, I prefer PostHog. It's an open-source product analytics tool that has a lot to offer:
event-based analytics: funnels, event counts, cohort retention analysis
user segmentation
feature flags
session recordings
All of that is available for free if you're ready to self-host. Paid cloud versions offer even more – e.g. A/B tests, multivariate feature flags & notifications – but comes with usage-based pricing.
I prefer Buratto as I'm not technical enough to spin up an instance on my own and don't want my billing to scale if an idea takes off. So I don't need an engineer to run a server for me (which is a cost in itself in both time and money), can quickly export all my data and will not be forced to pay more & more.
Setup
The steps below will take you from 1 to 5 hours depending on your pagecount. I'll walk you through:
Webflow account prep
Google Tag Manager container setup
Linking Webflow site to Google Tag Manager container
Tracking Webflow button clicks in Google Tag Manager
Sending events to PostHog (or other tools, for that matter)
Prepare Webflow
For starters, you need a Webflow plan that allows for custom code. Webflow has 2 pricing modes:
Site – works with particular website
Workspace – works with all sites in a team
At the time of writing (September 2023) it's at least:
Core workspace plan ($28/month) or
Basic site plan ($18/month)
For now I went with Basic site plan, but might switch to Workspace later if I need more sites. Oddly enough, using a custom domain requires a Site plan even if you have a Workspace plan.
Create Google Tag Manager container
New container usually takes 10 minutes:
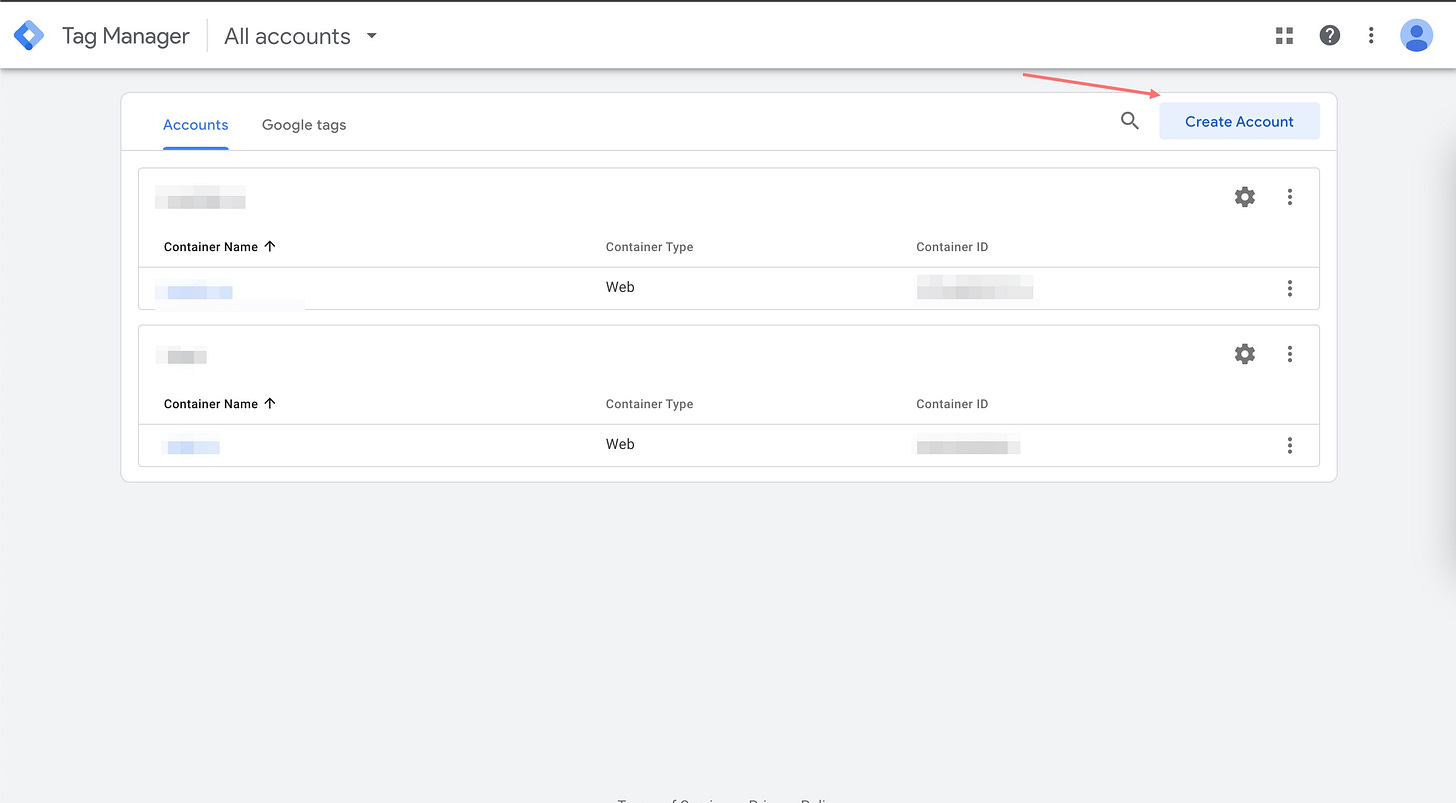
Go to GTM, log in with your Google account and click on "Create Account":
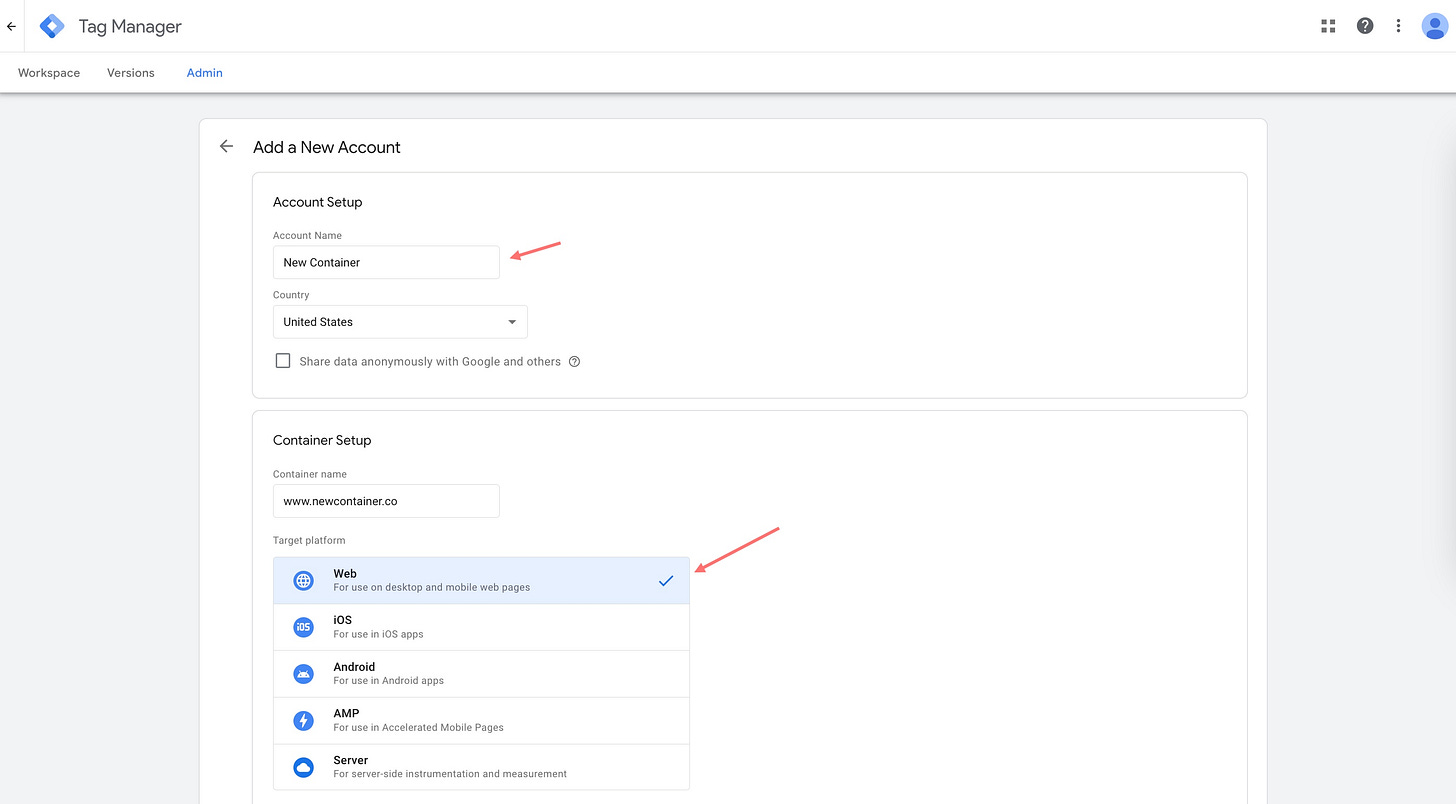
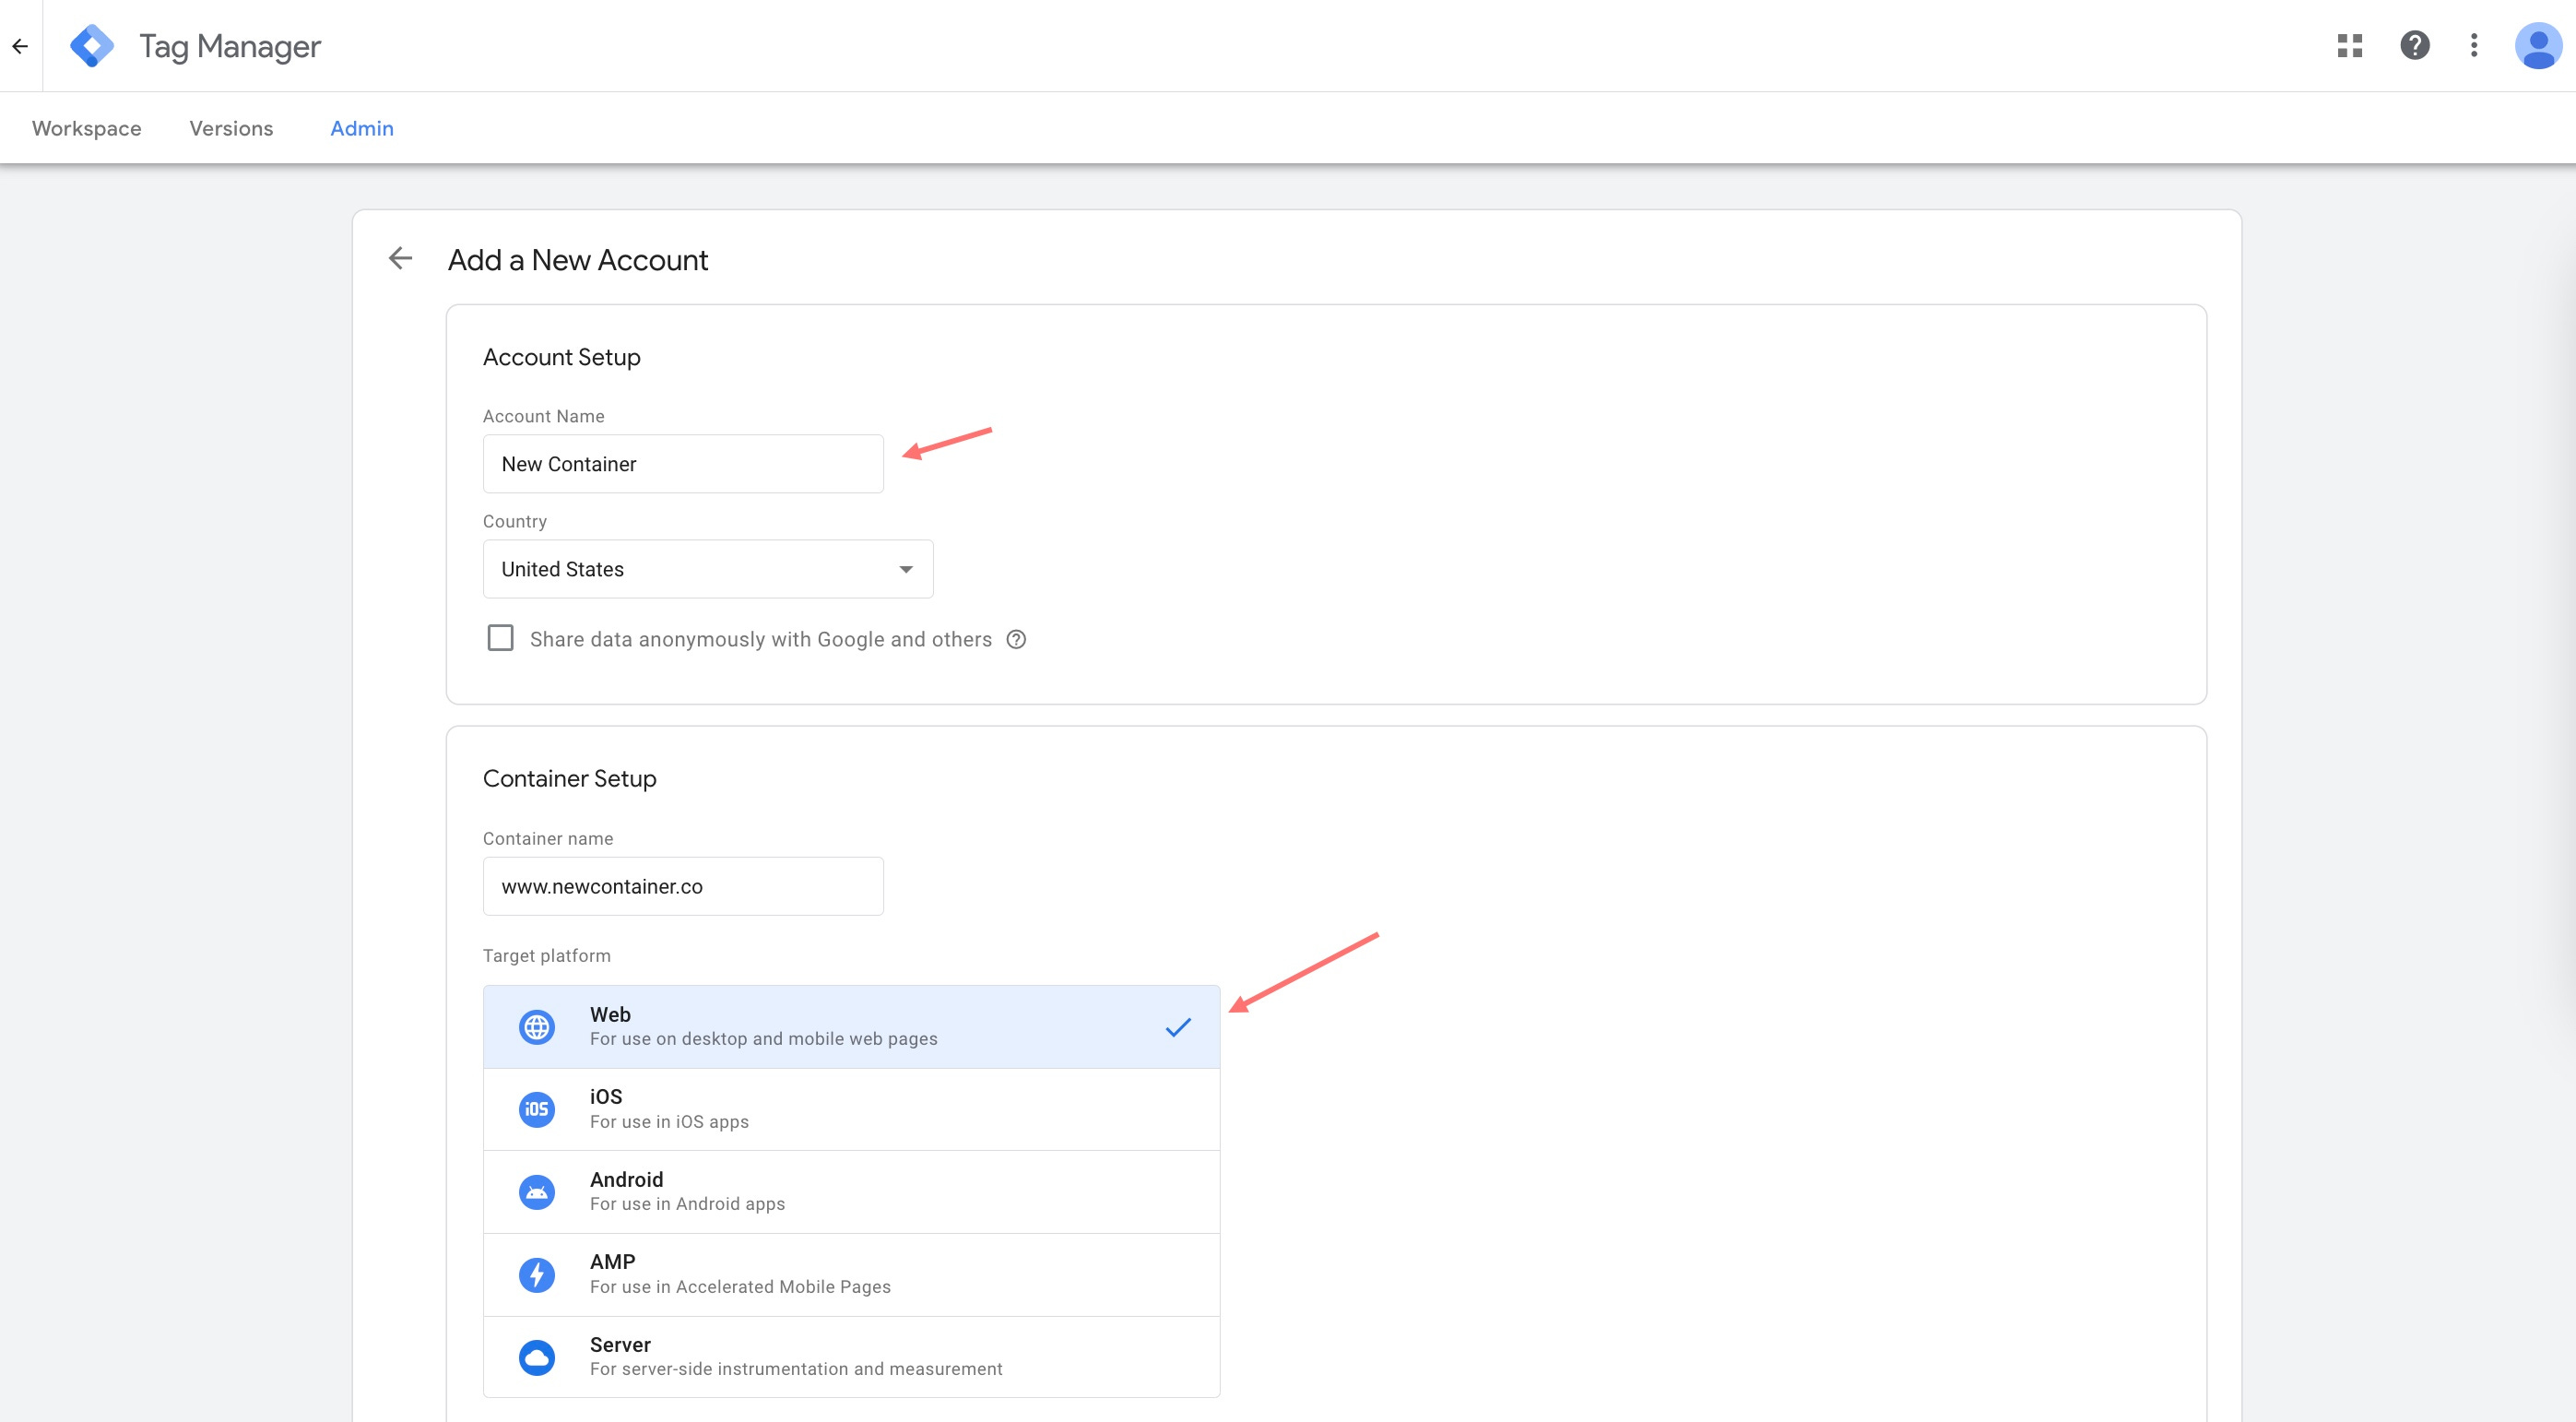
Then, name your account, paste URL of your site, select country and "Web" as data source:
Container is created and now we need to add it to the website:
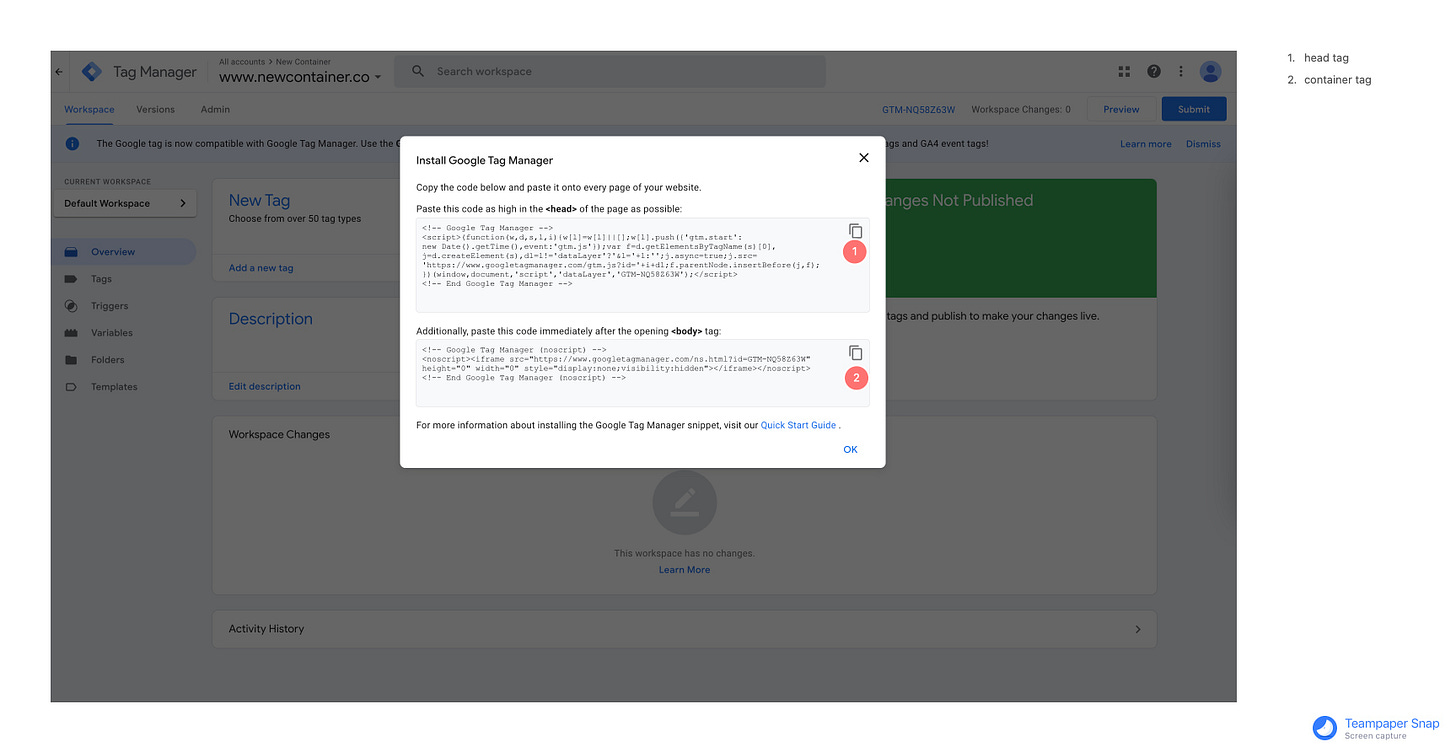
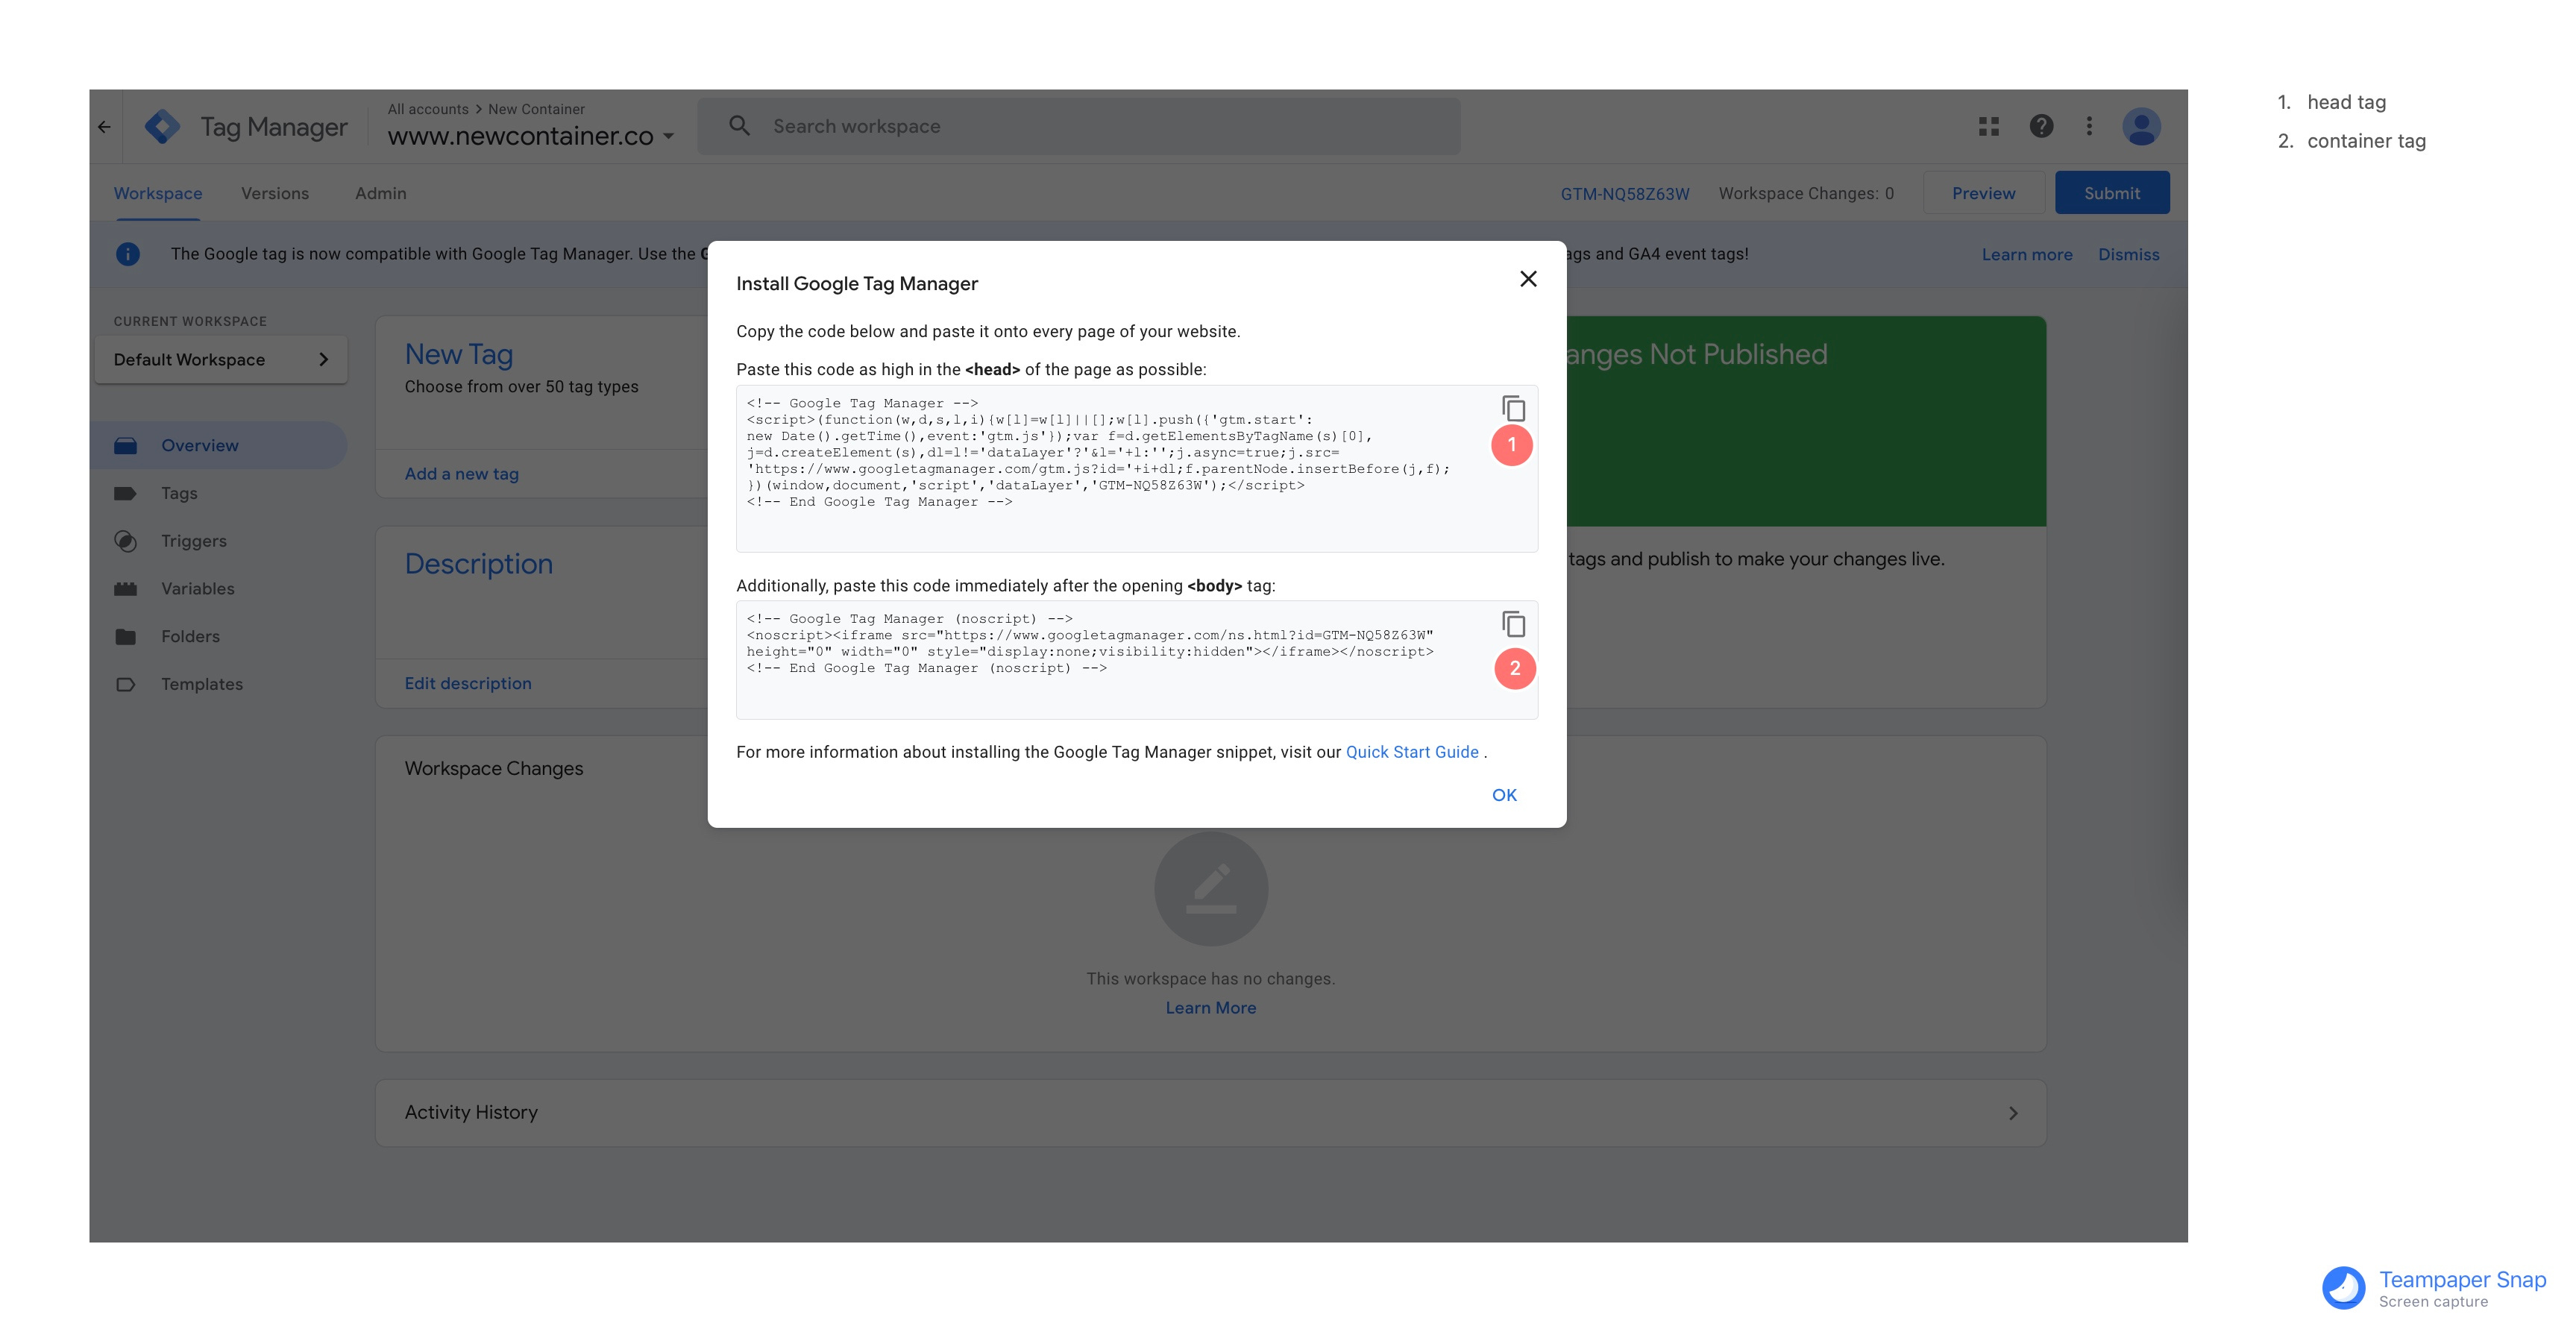
Add GTM code to Webflow
Now, go to your Webflow website settings (usually
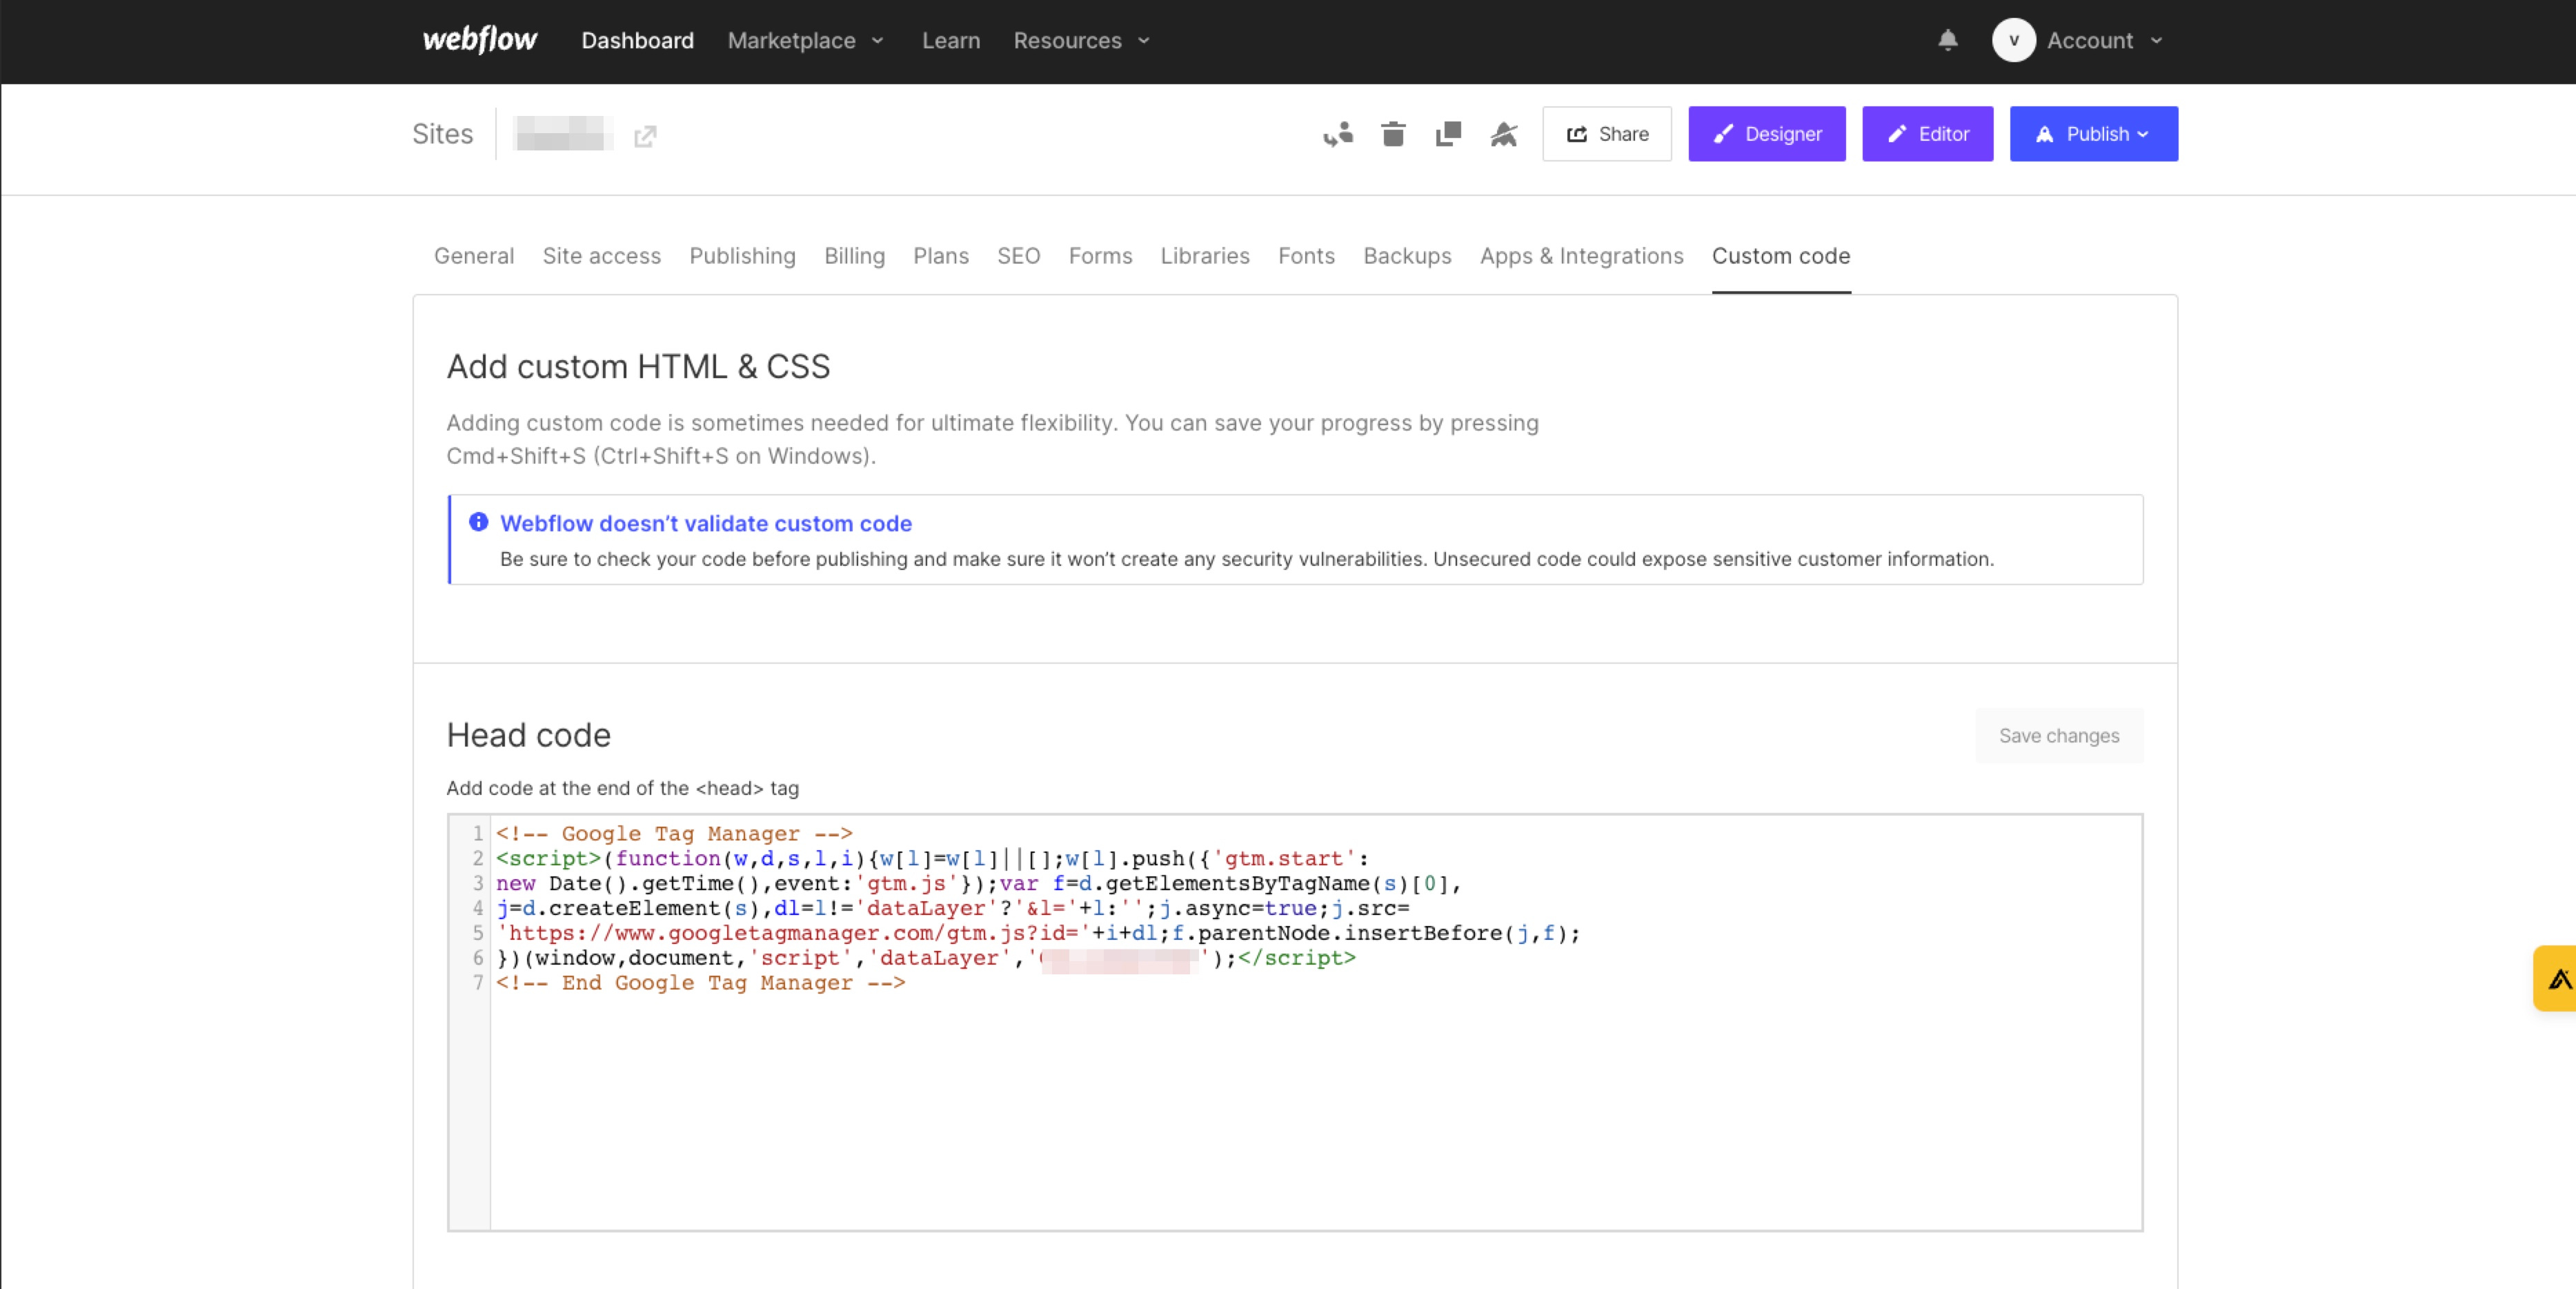
https://webflow.com/dashboard/sites/my_site_name_slug/code), paste code snippet (1) from the screenshot above into the "Head code" section and click "Save changes":
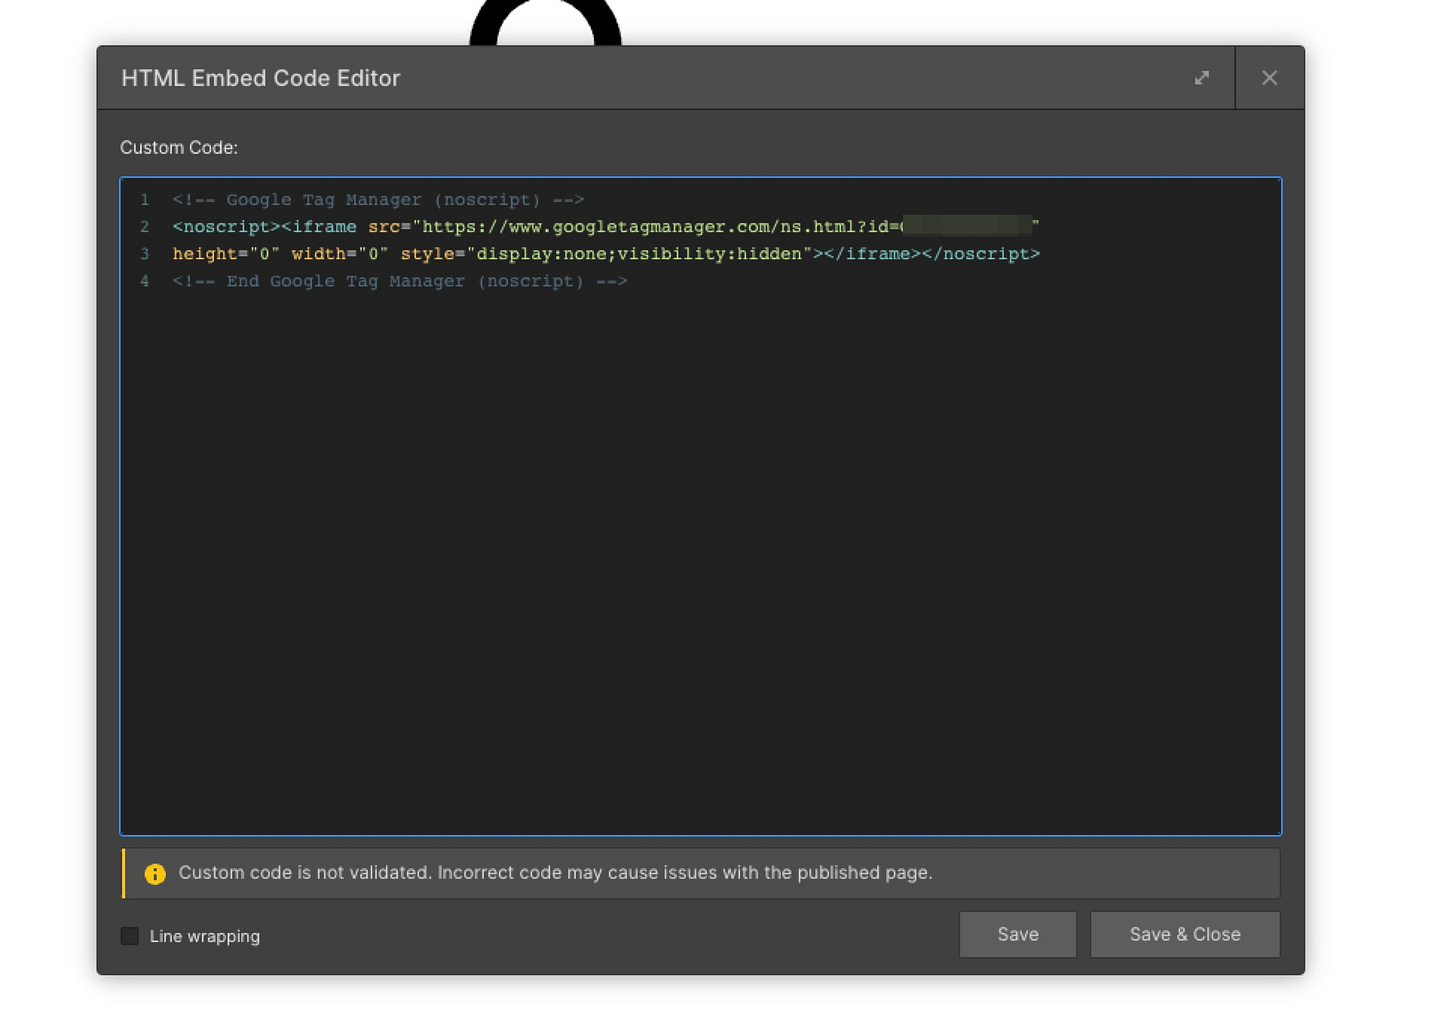
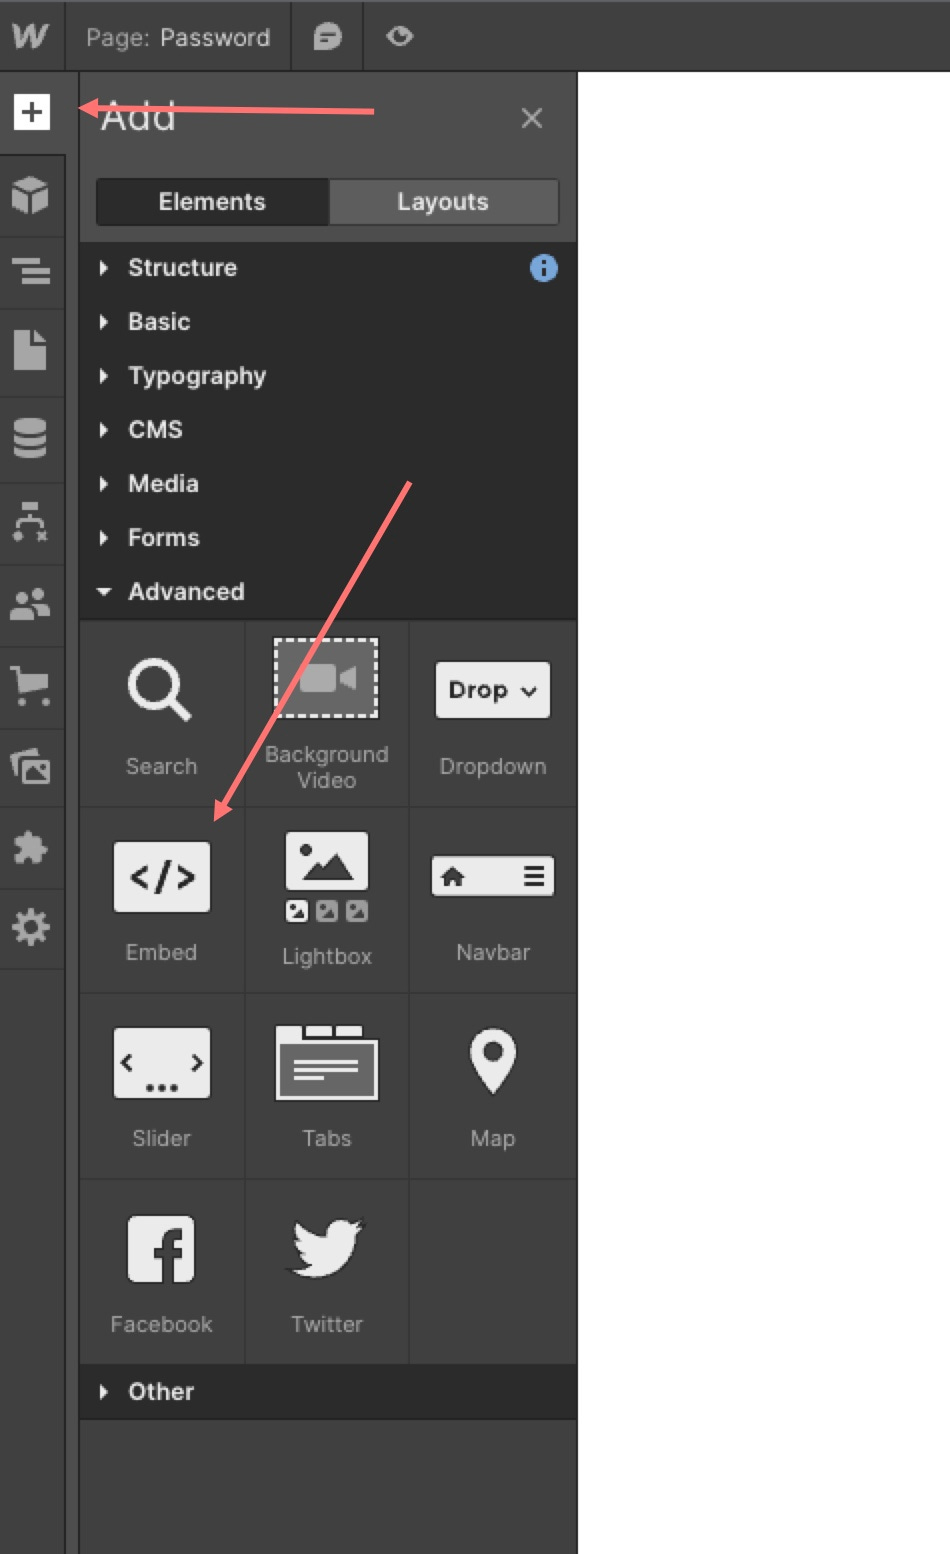
After that, go to any page in Designer and add a new HTML block:

Paste code snippet (2) in the opened window and click "Save & close":
Select freshly added "HTML Embed" block in Navigator:

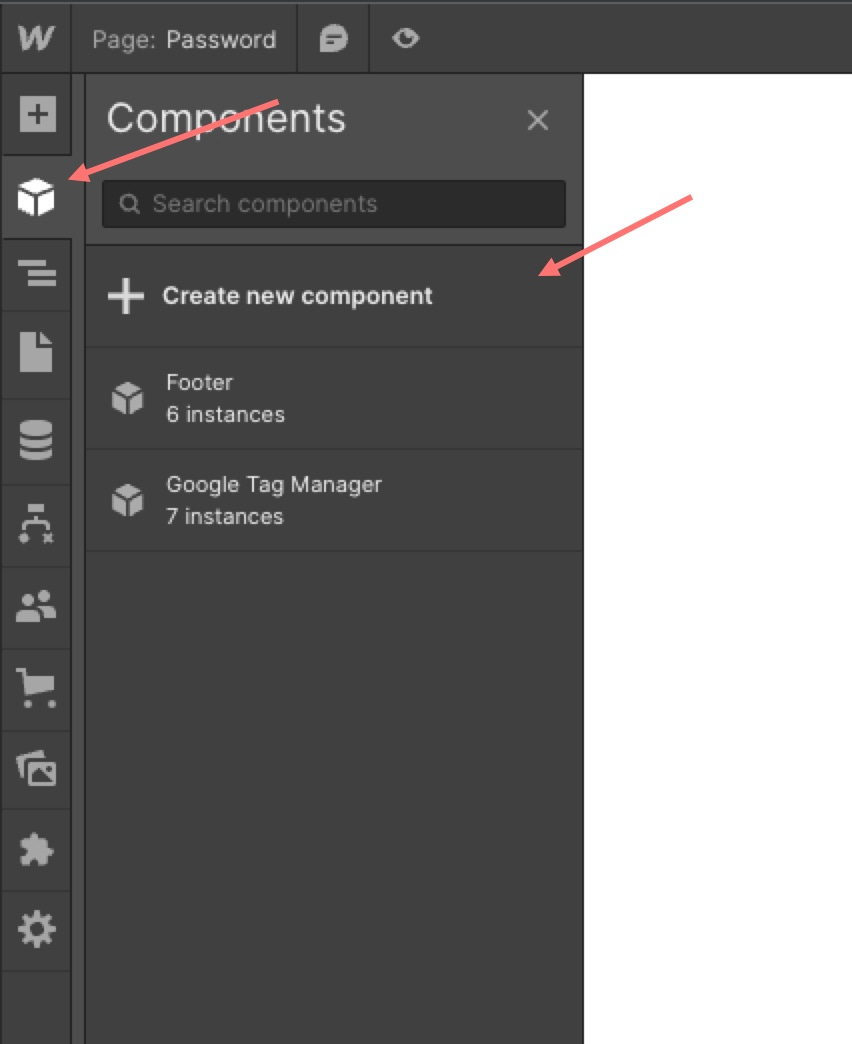
Go to "Components", click "Create new component", name it and hit "Create":


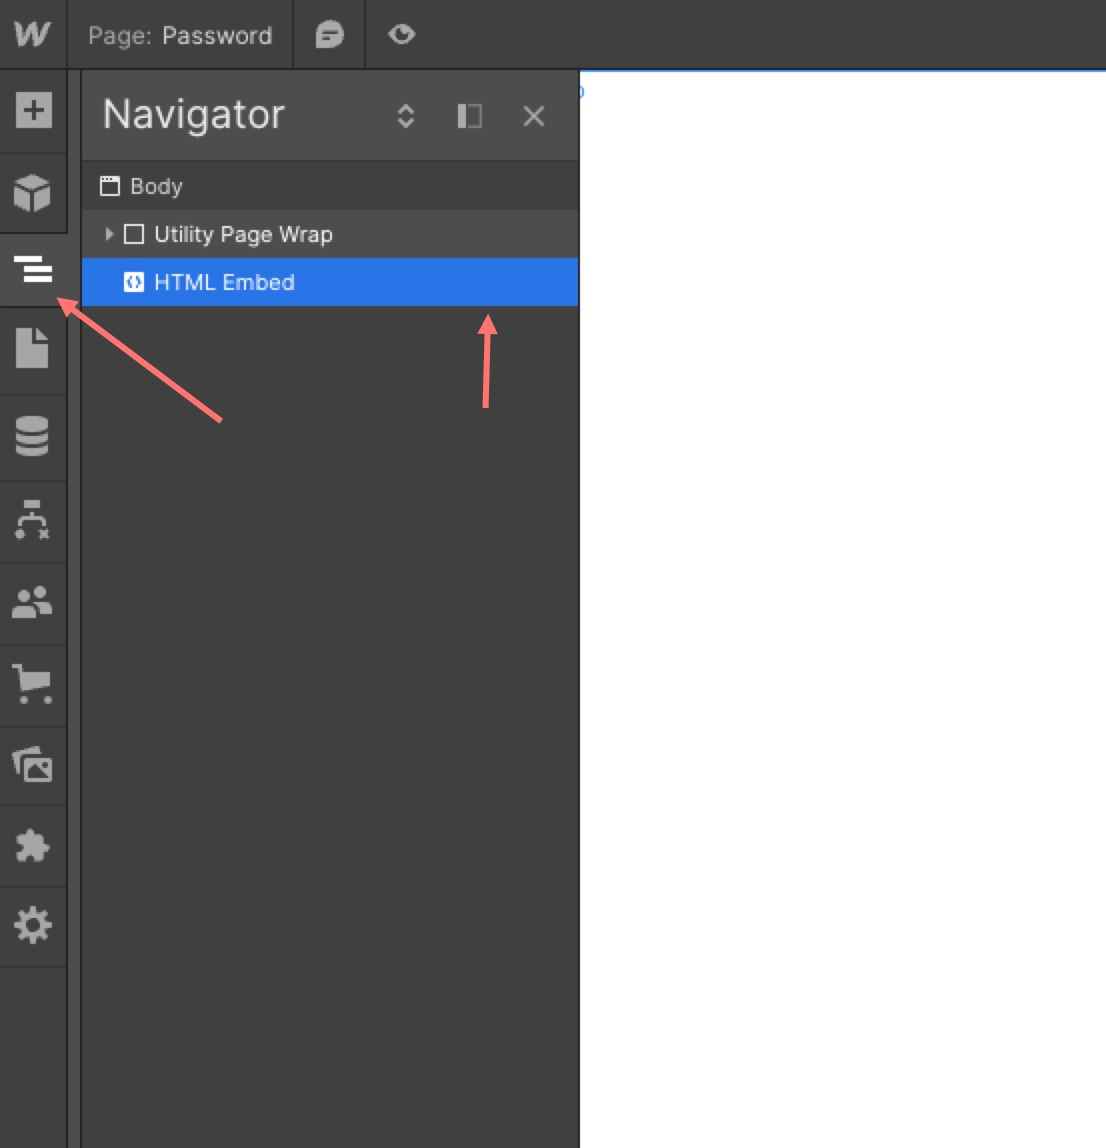
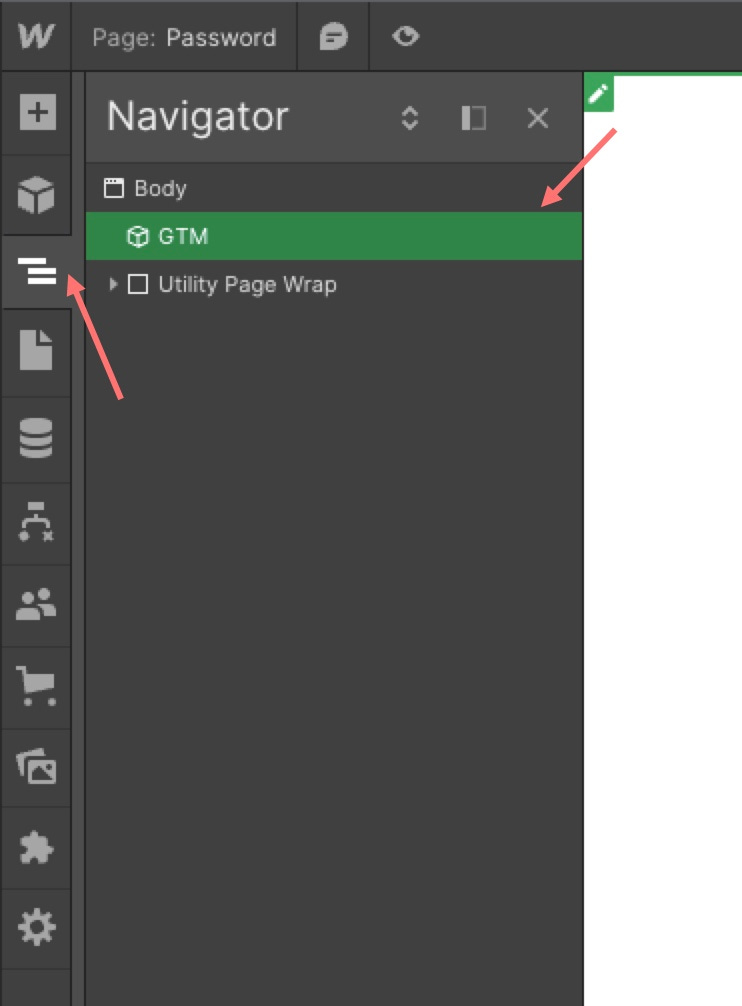
HTML embed with GTM snippet just became reusable piece of code. If you want GTM to load on the page, add it to it above all the other blocks in Navigator:
Send events to GTM
Internet does not have much info on how to use GTM with Webflow (aside from this Medium article by Graham McNicoll. I tried several ways but found that the most flexible way for me was to
use slightly reused script from the mentioned article
add a new CSS class to all the page elements I tracked (e.g. buttons)
add new GTM variables for events
send custom attributes with each element interaction as GTM variables to tell one button from another
This step takes a bit of time at first but saves a lot of it down the line. You need to mark all the buttons manually and set up variable tracking, but in the end you can use just one GTM trigger to get all the events instead of 1 event = 1 trigger.
Track all the events
First, you need to add the script below to "Footer code" section of "Custom code" page in Webflow site settings:
<script type="text/javascript">

  //GA Event Tracker Script. Licensed under MIT. Free for any use by all. Written by Paul Seal from codeshare.co.uk and modified by Vlad Nadymov from buratto.co

  // Get the category, action and label from the element and send it to GA. The action is optional, because mostly it will be a click event. Replace "webflow_event" with the event name you need.

  // Values of variables EventCategory, EventAction and EventLabel will be taken from Webflow element's Custom Attributes and sent to GTM as variables `eventCategory`, `eventAction` and `eventLabel`. Replace attribute names in Webflow or add new ones if necessary. Same with GTM – add new variables in container and `x` below and they will be tracked.

  var trackClickEvent = function () {
    var EventCategory = this.getAttribute("eventCategory");
    var EventAction = this.getAttribute("eventAction");
    var EventLabel = this.getAttribute("eventLabel");
    var x = {'event': 'webflow_event','eventCategory': EventCategory,'eventAction': EventAction,'eventLabel': EventLabel}
    console.log(x);
    dataLayer.push(x);
  };

  // Find all of the elements on the page which have the class 'ga-event'. Replace "track_button" with the name of the class you use.

  var elementsToTrack = document.getElementsByClassName("track_button");

  // Add an event listener to each of the elements you found

  var elementsToTrackLength = elementsToTrack.length;
  for (var i = 0; i < elementsToTrackLength; i++) {
    elementsToTrack[i].addEventListener('click', trackClickEvent, false);
  }

// It's possible to use this tag with several different classes. To do that, copy `elementsToTrack` variable and use the name of CSS class you want, then call `for` cycle one more time

</script>
JS snippet above does 3 things:
maps Webflow Custom Attributes with GTM event Variables
looks up all elements by their CSS class
whenever someone interacts with an element with defined class, push custom event & variables to GTM dataLayer
After that:
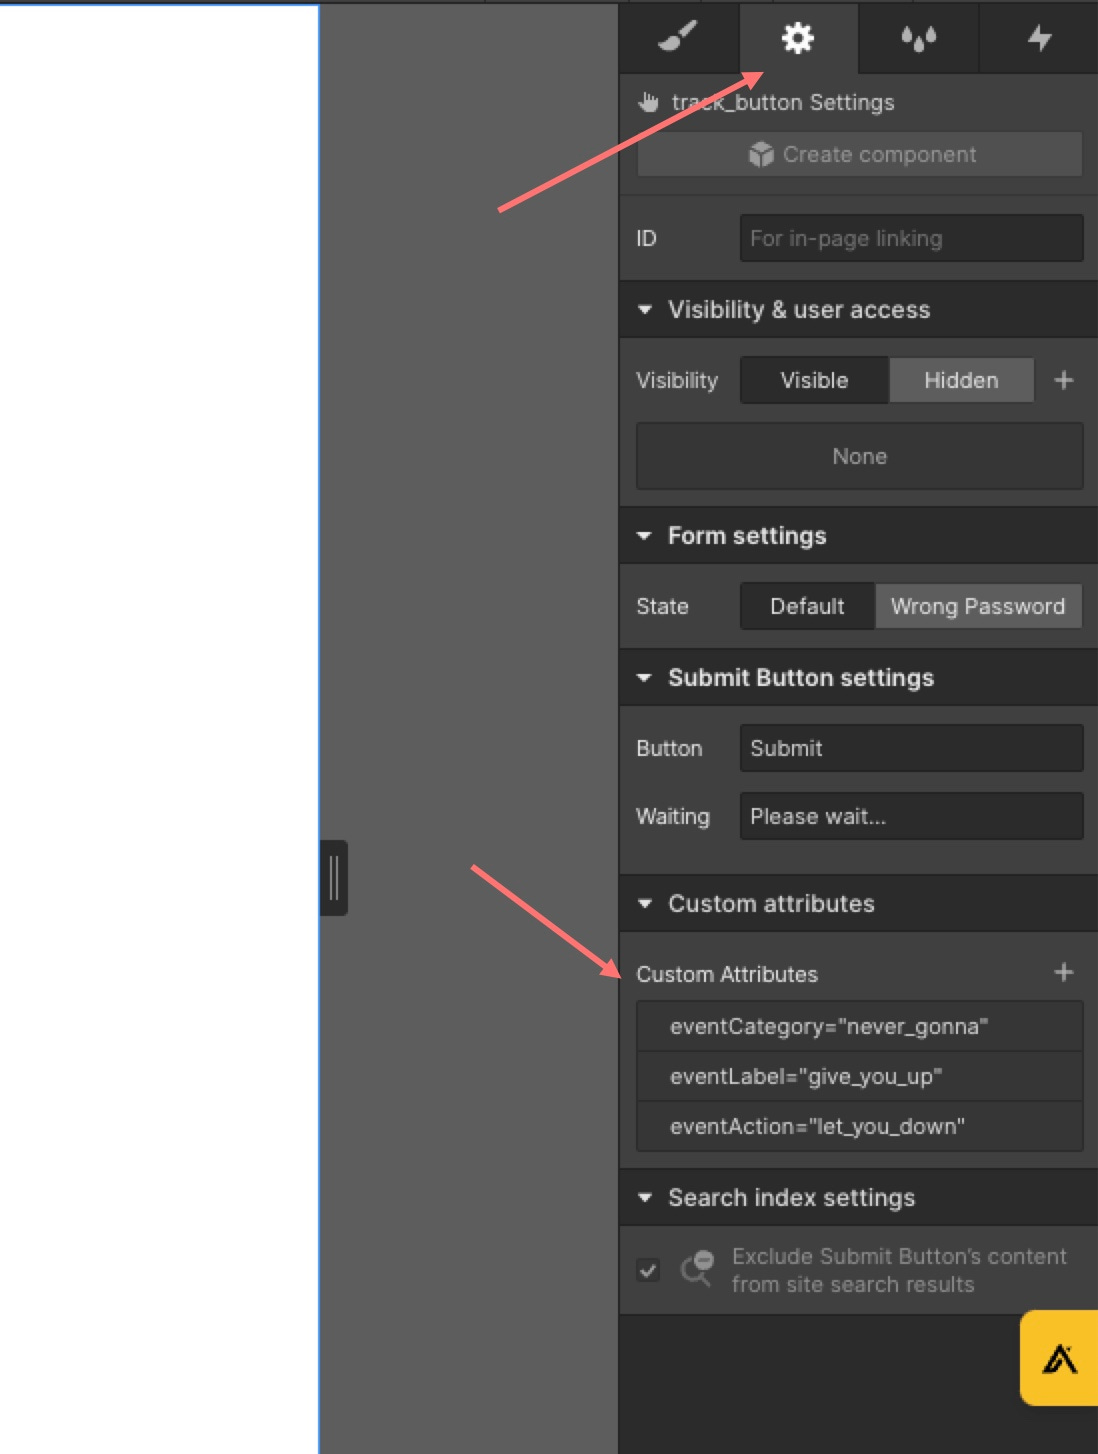
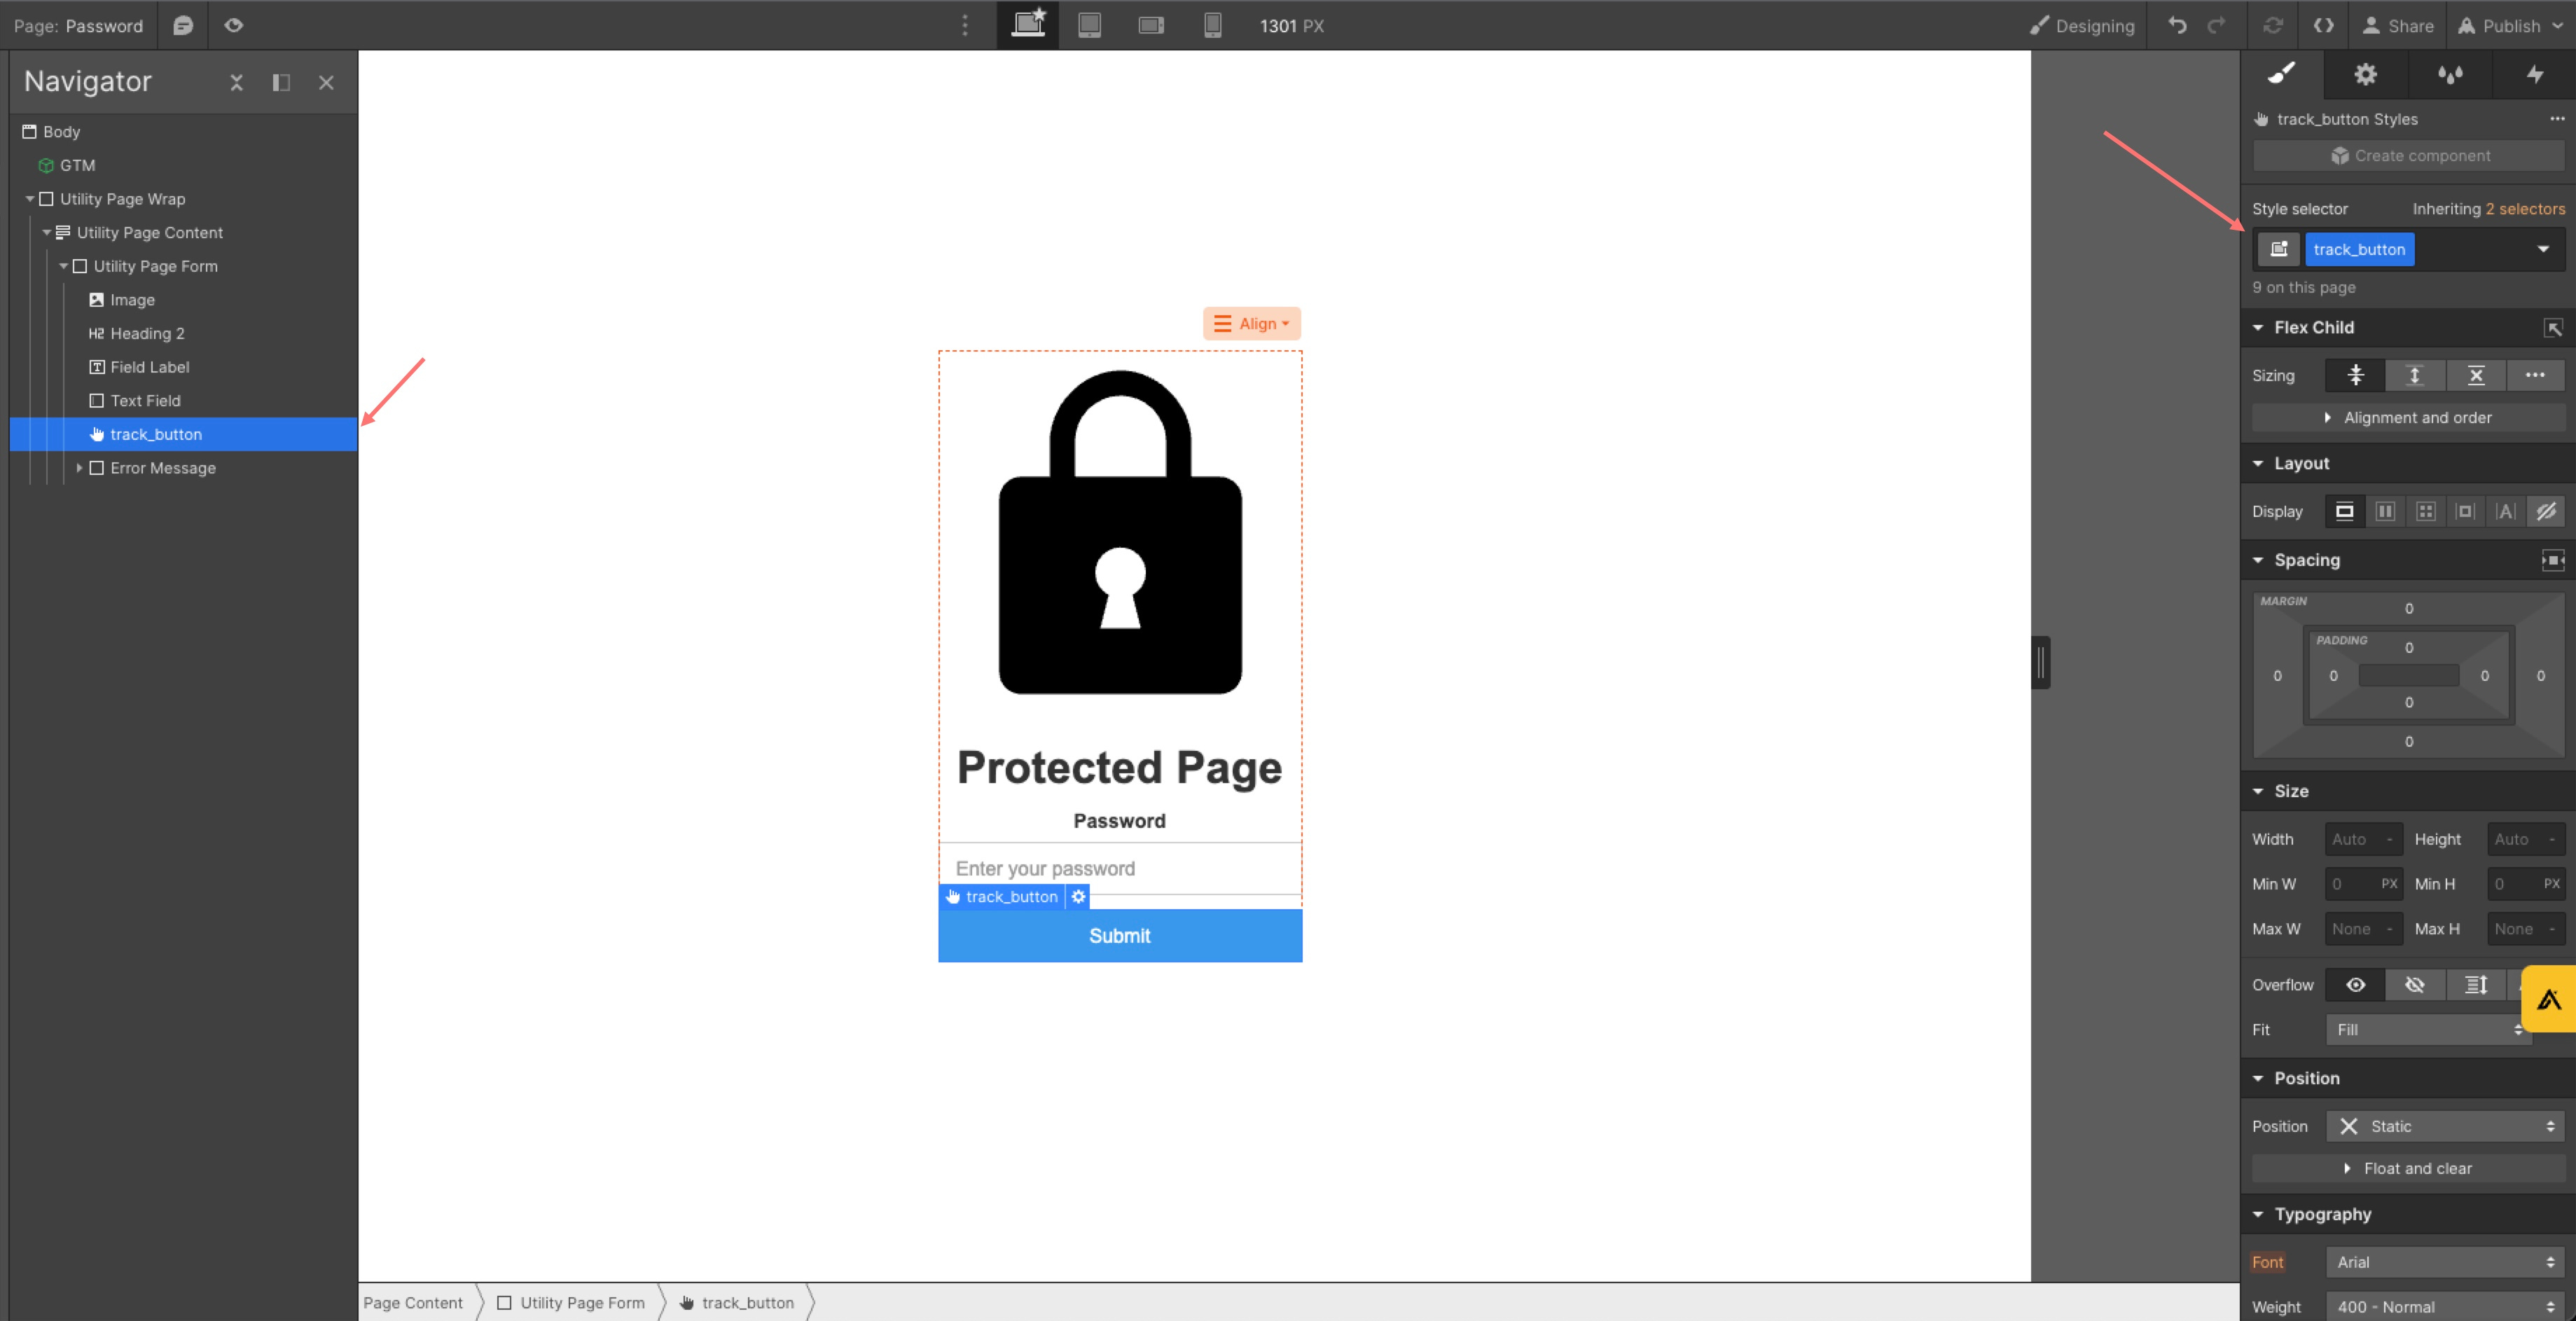
Add class above to all the elements to track in "Style -> Style selector" section of element. Classes exist on page level – need to add class with the same name separately on each page:

Add custom atttributes in "Element Settings -> Custom attributes" section of the element. Name them the same as values in `this.getAttribute()` function in the snippet above or they will not be tracked. Track as many as you want to slice and dice them later, e.g. one for the page (main_landing or pricing), one for the page section (e.g. header or how_it_works), one for particular element (e.g. click_button)
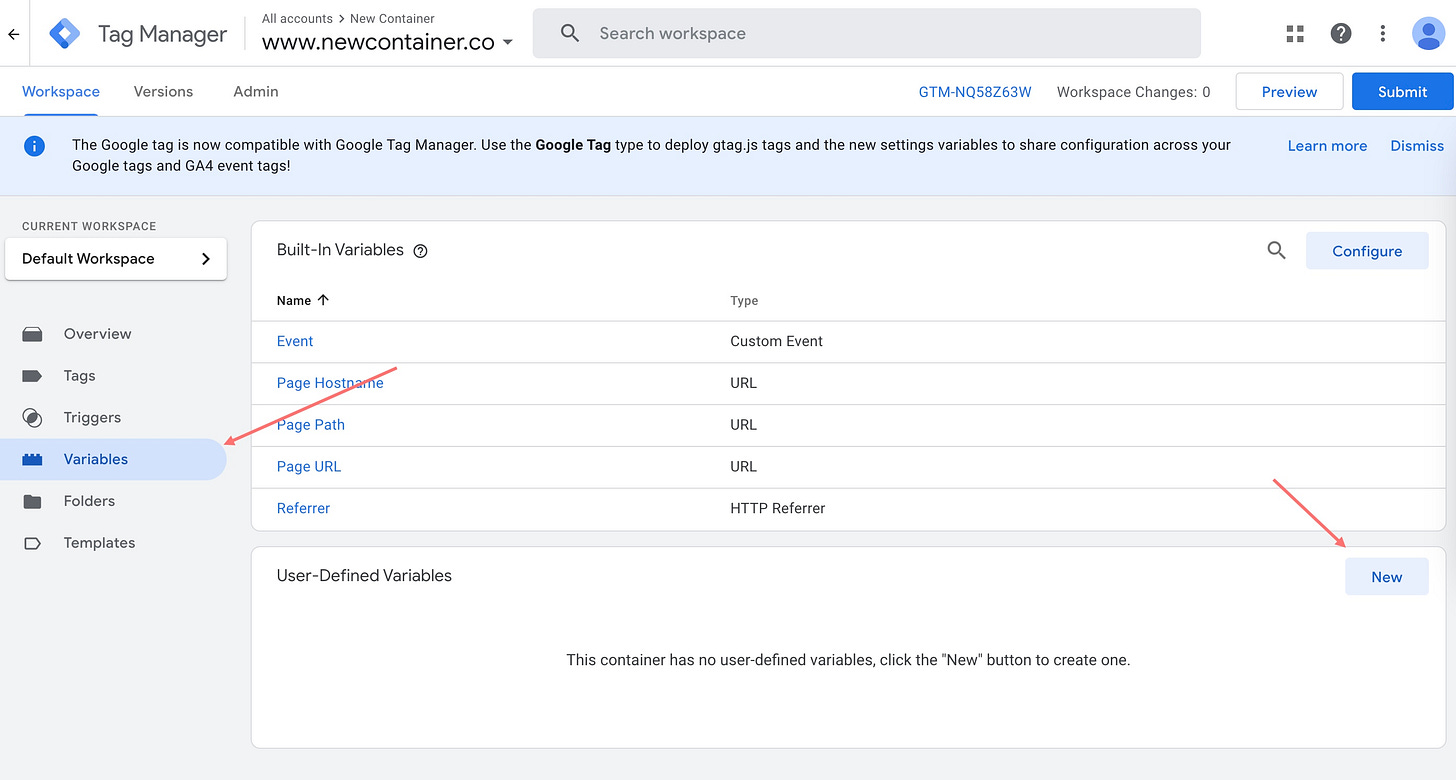
Add GTM variables
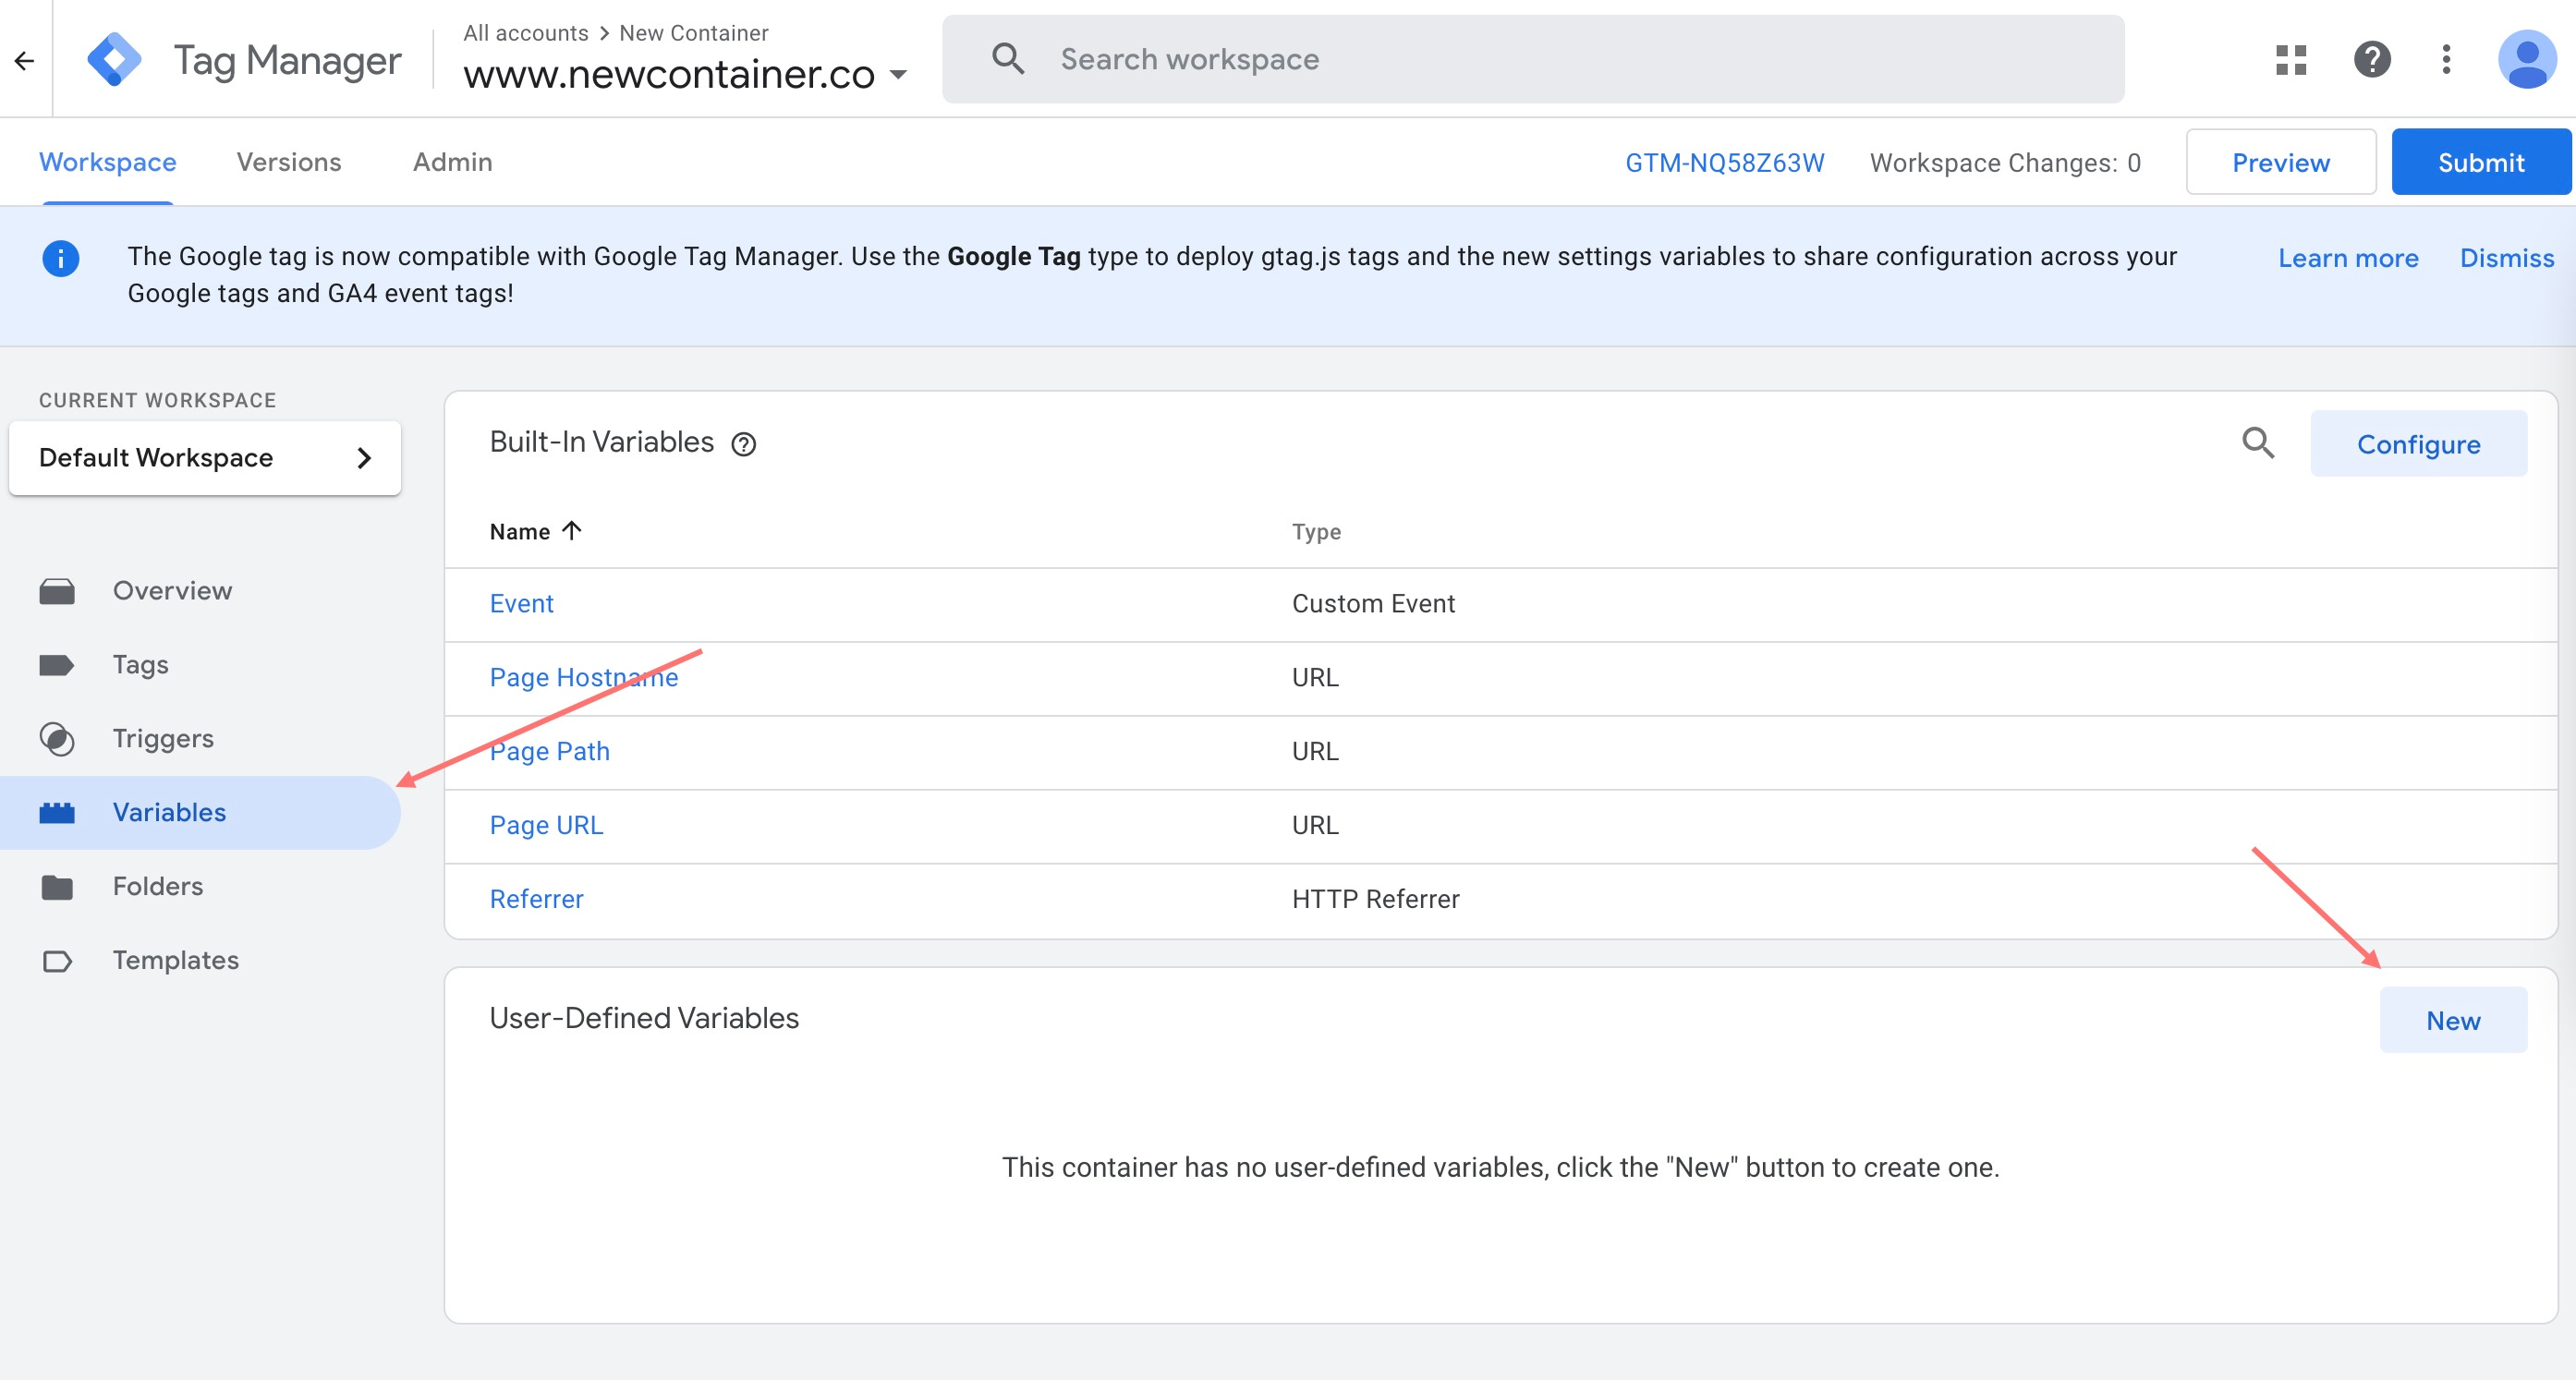
go to "Variables" page and click on "New" in "Custom Variables" section:
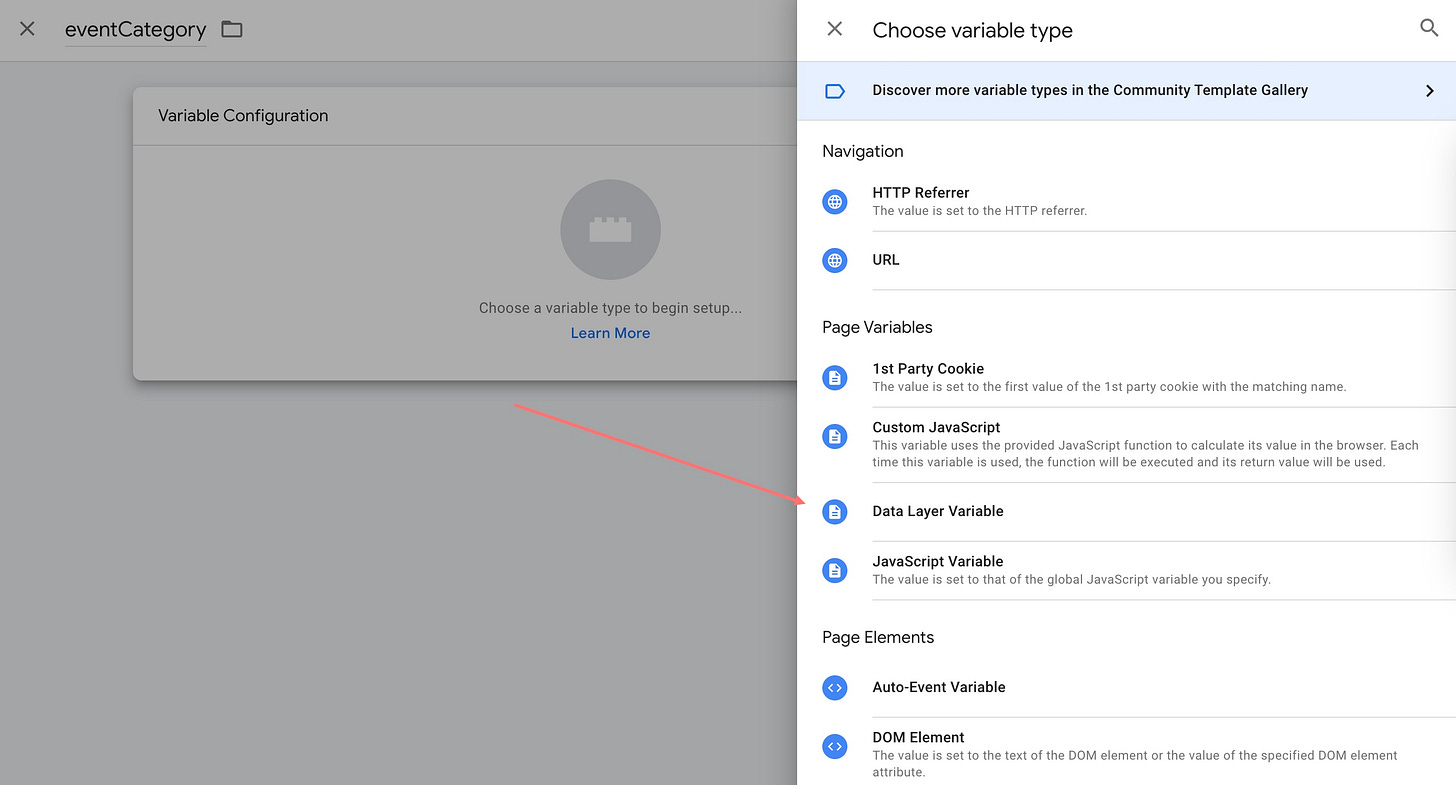
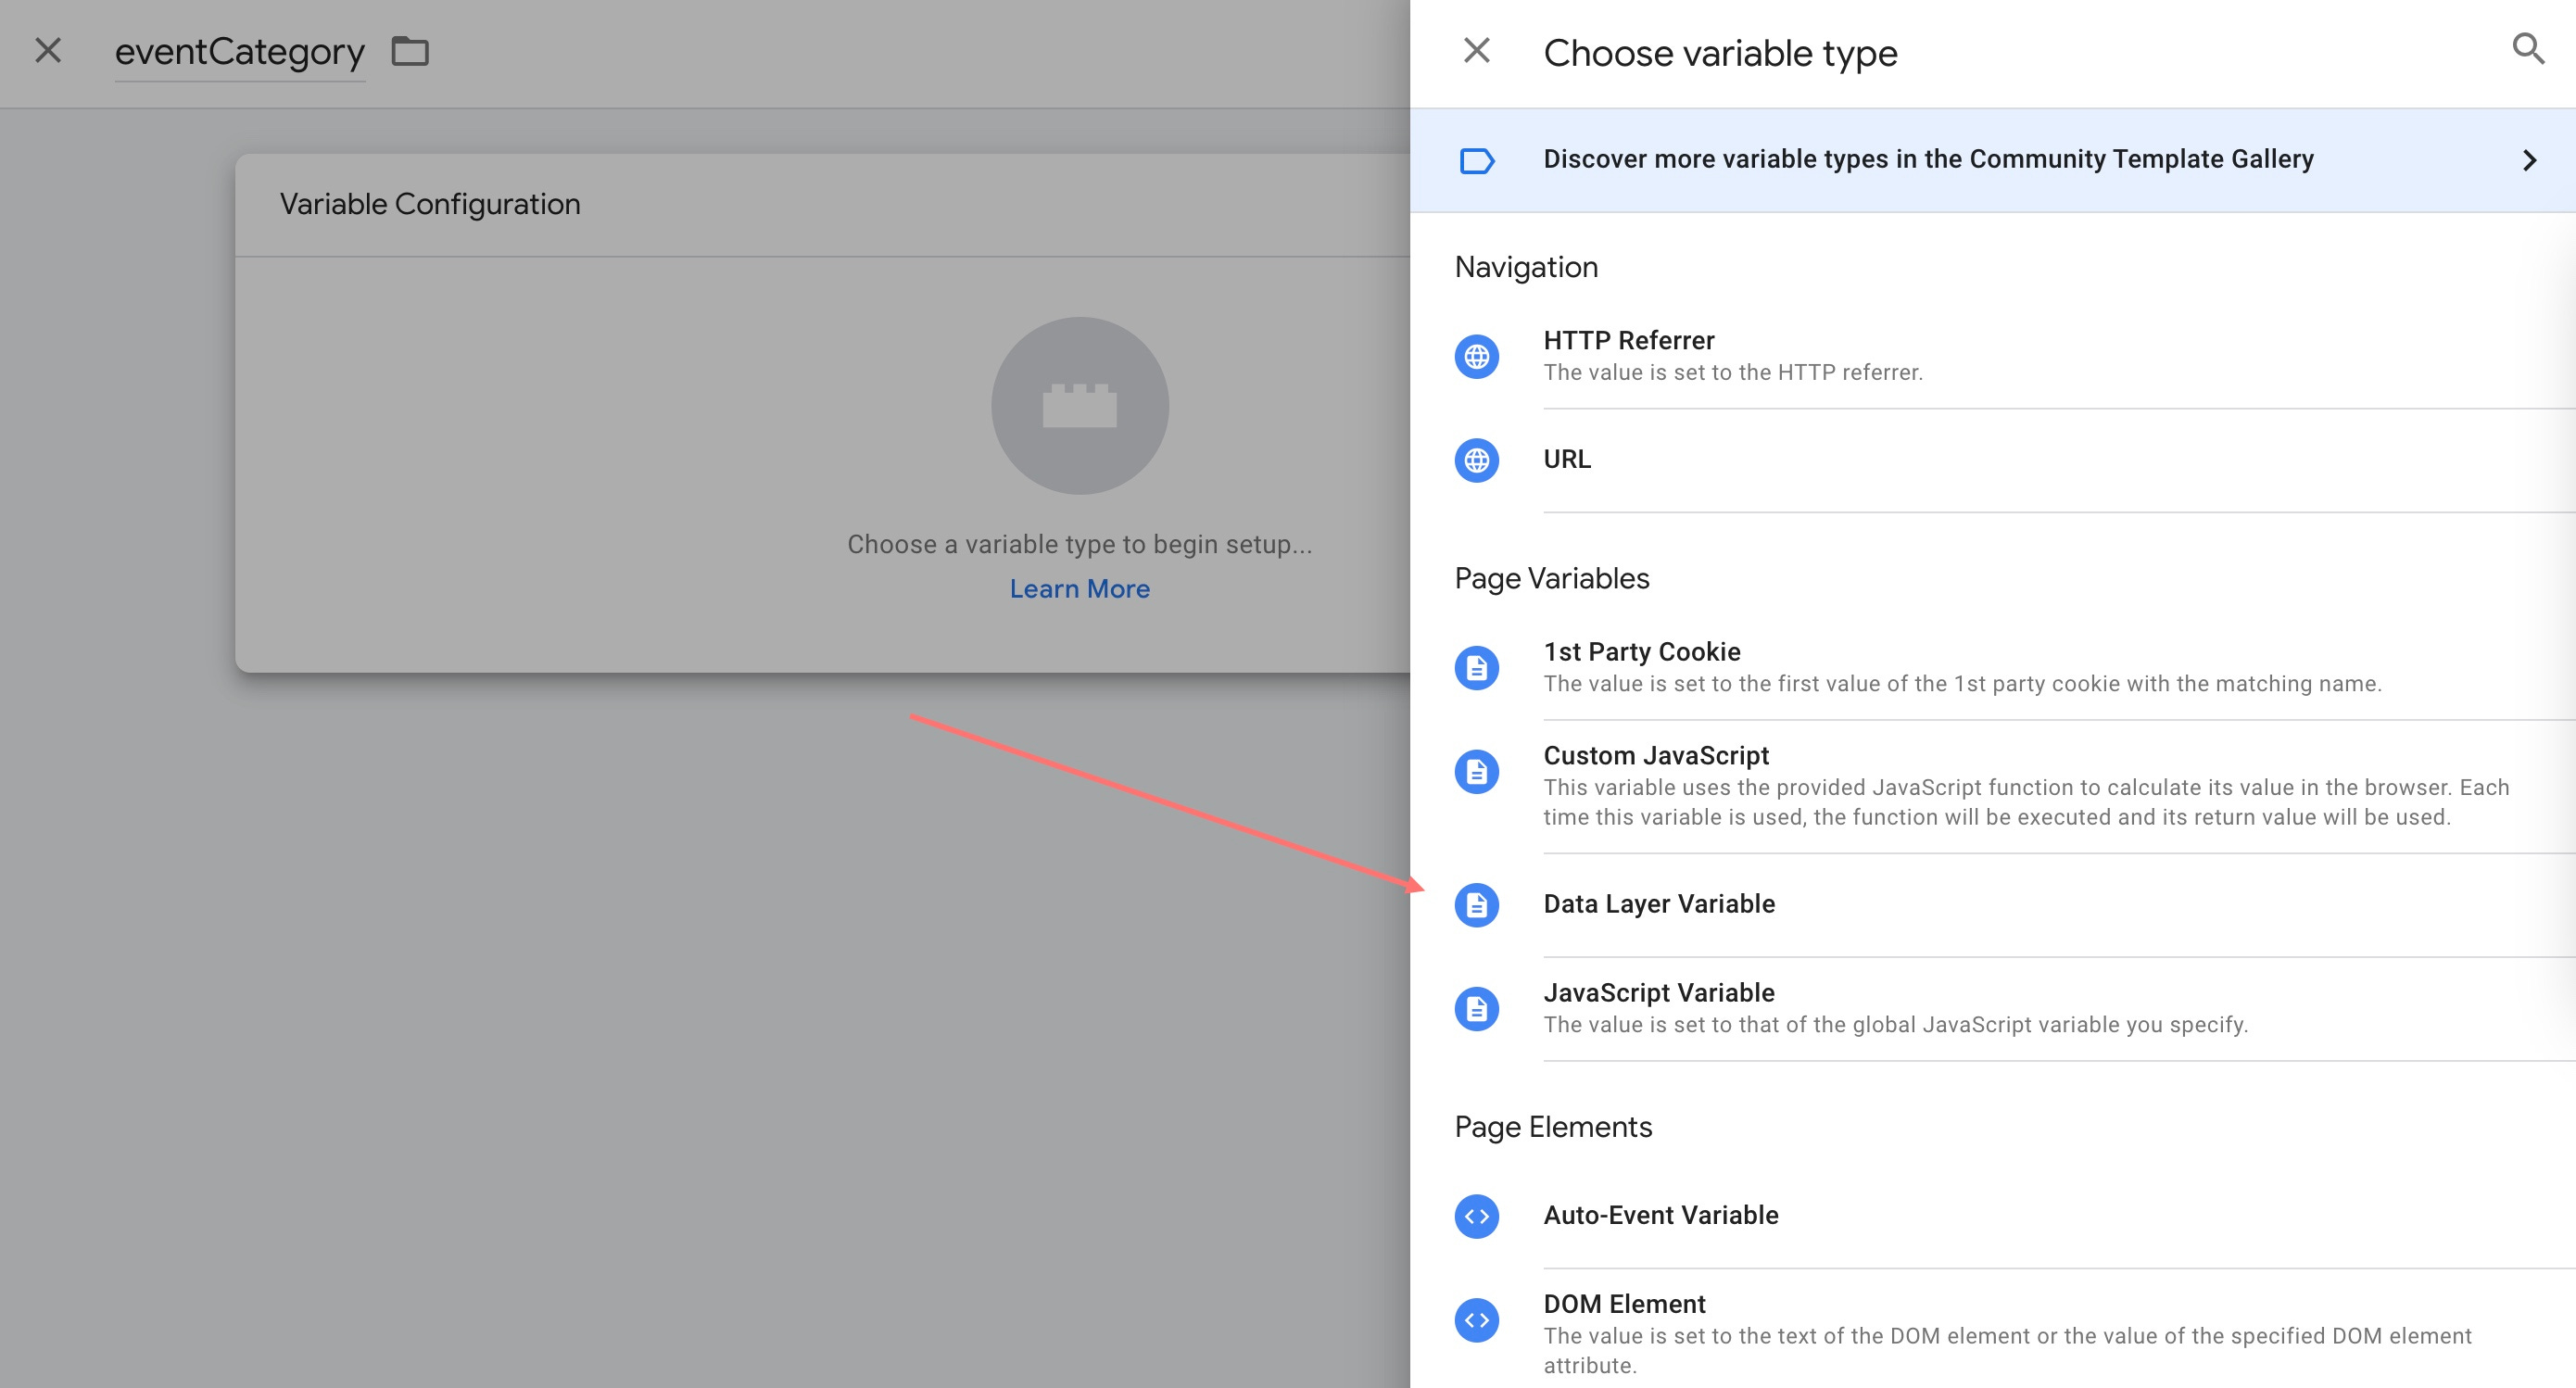
choose "Data Layer Variable" type:
type in variable name (same as Custom Attribute from the last step):


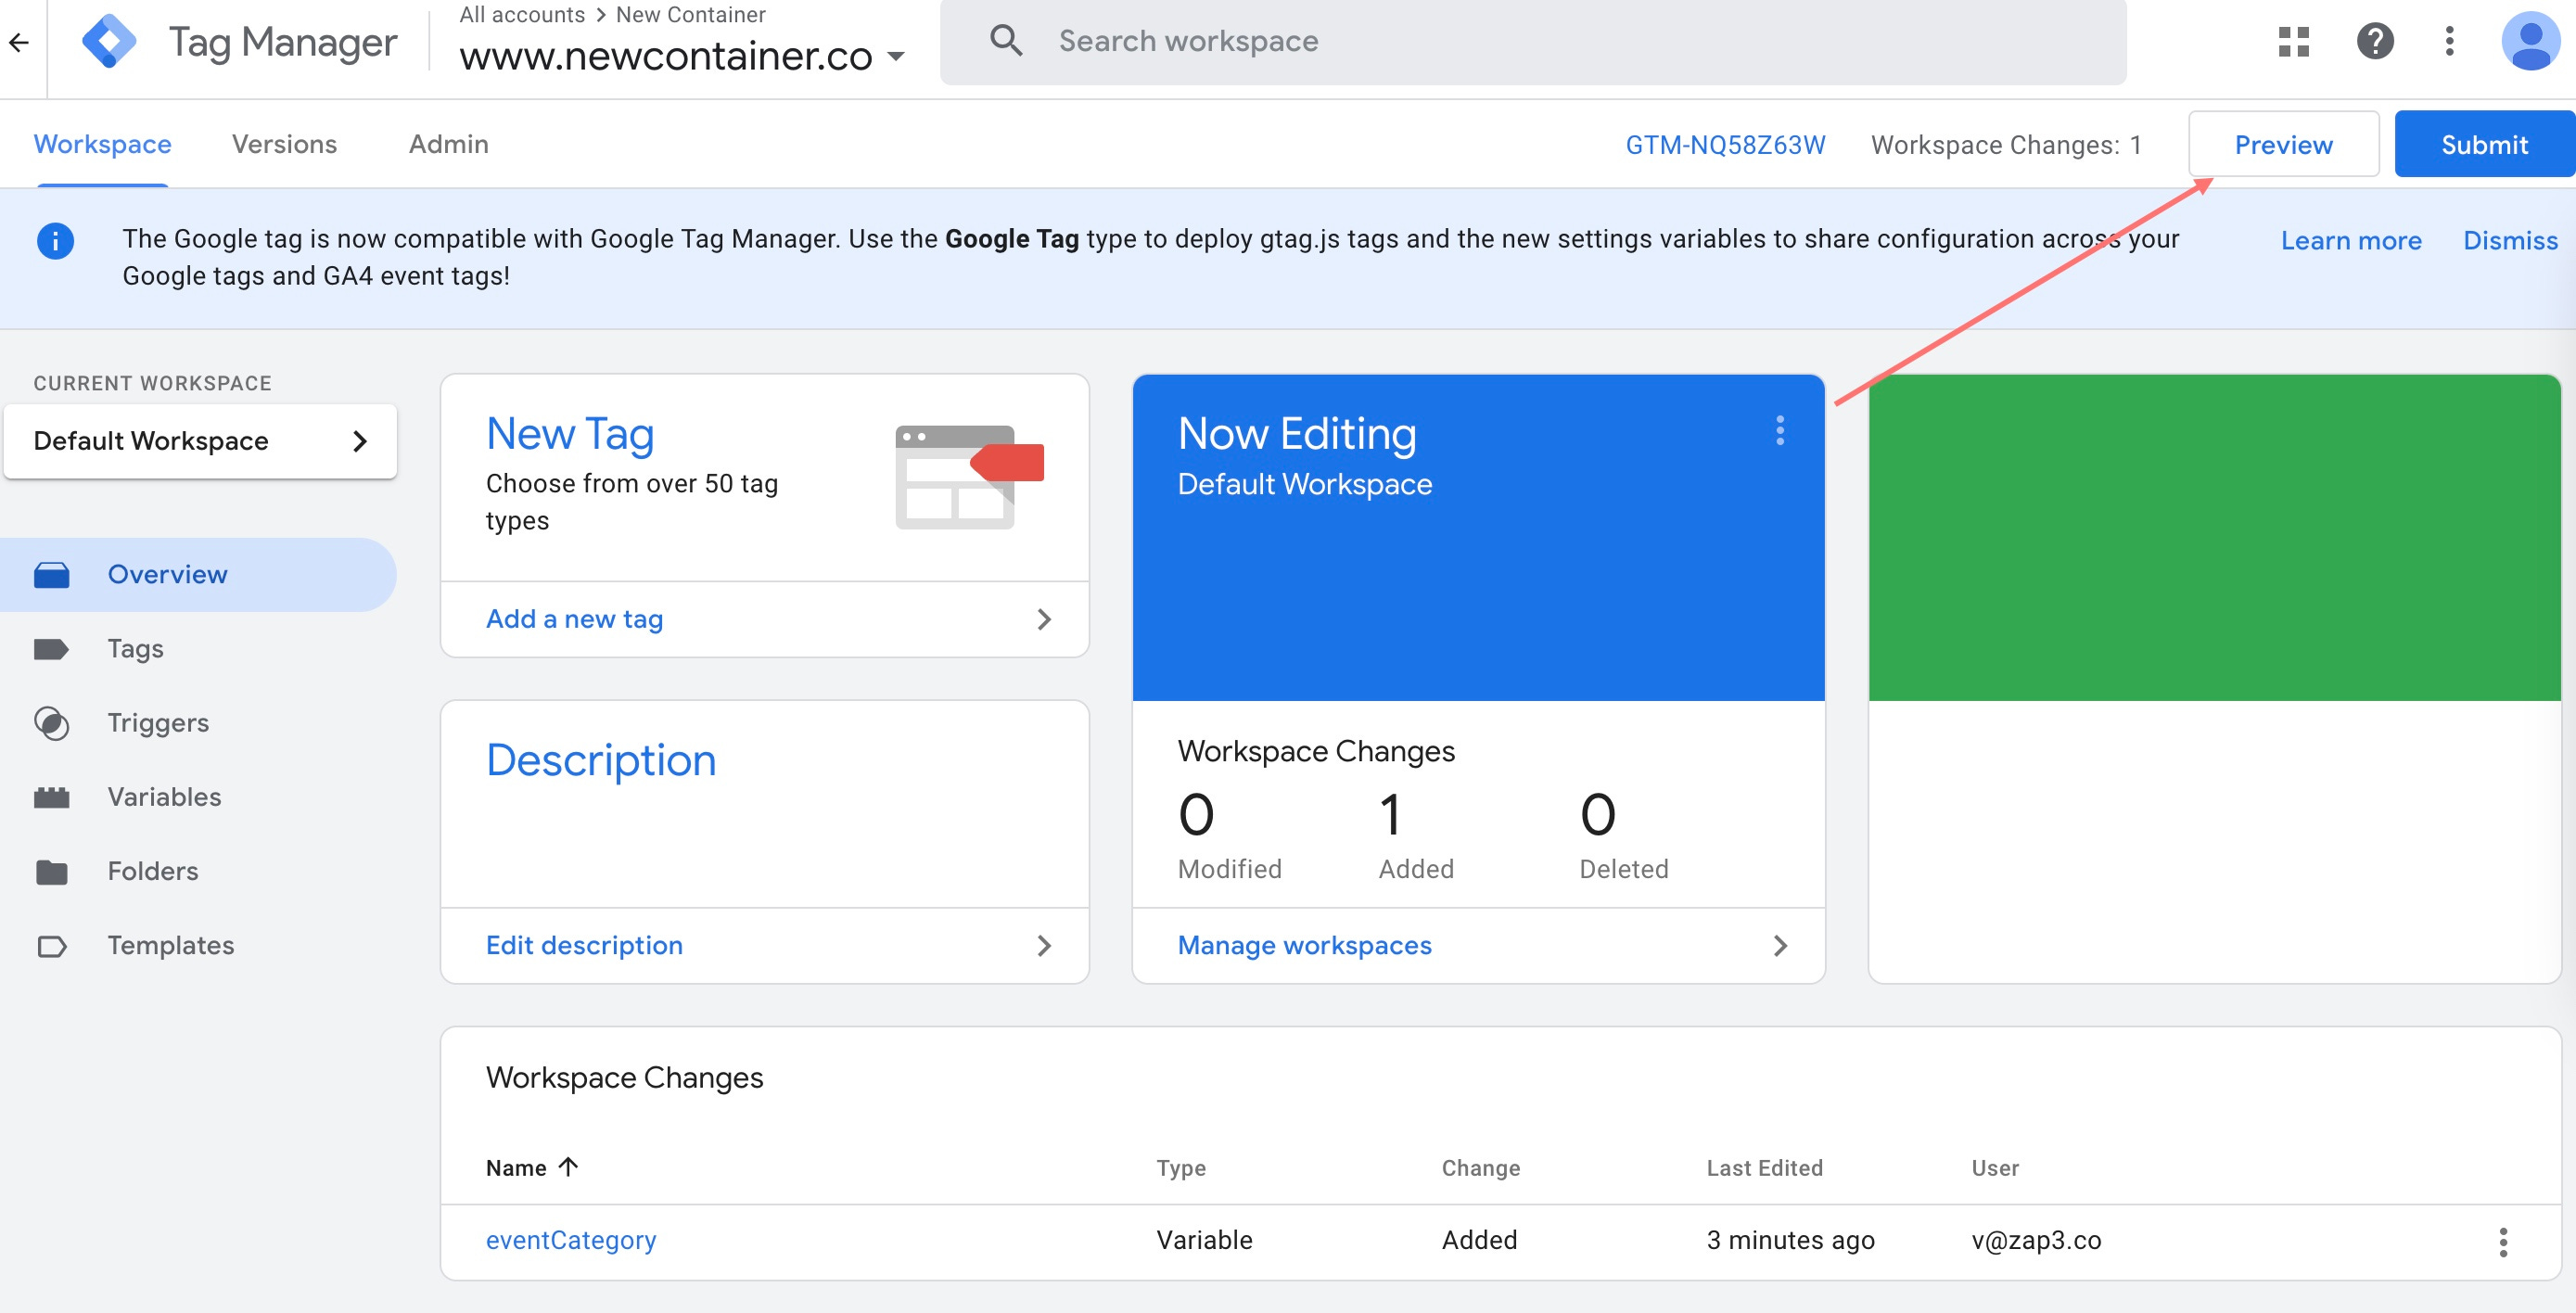
Now it's time to test. Hit "Preview" in GTM and then click the buttons you've just added:
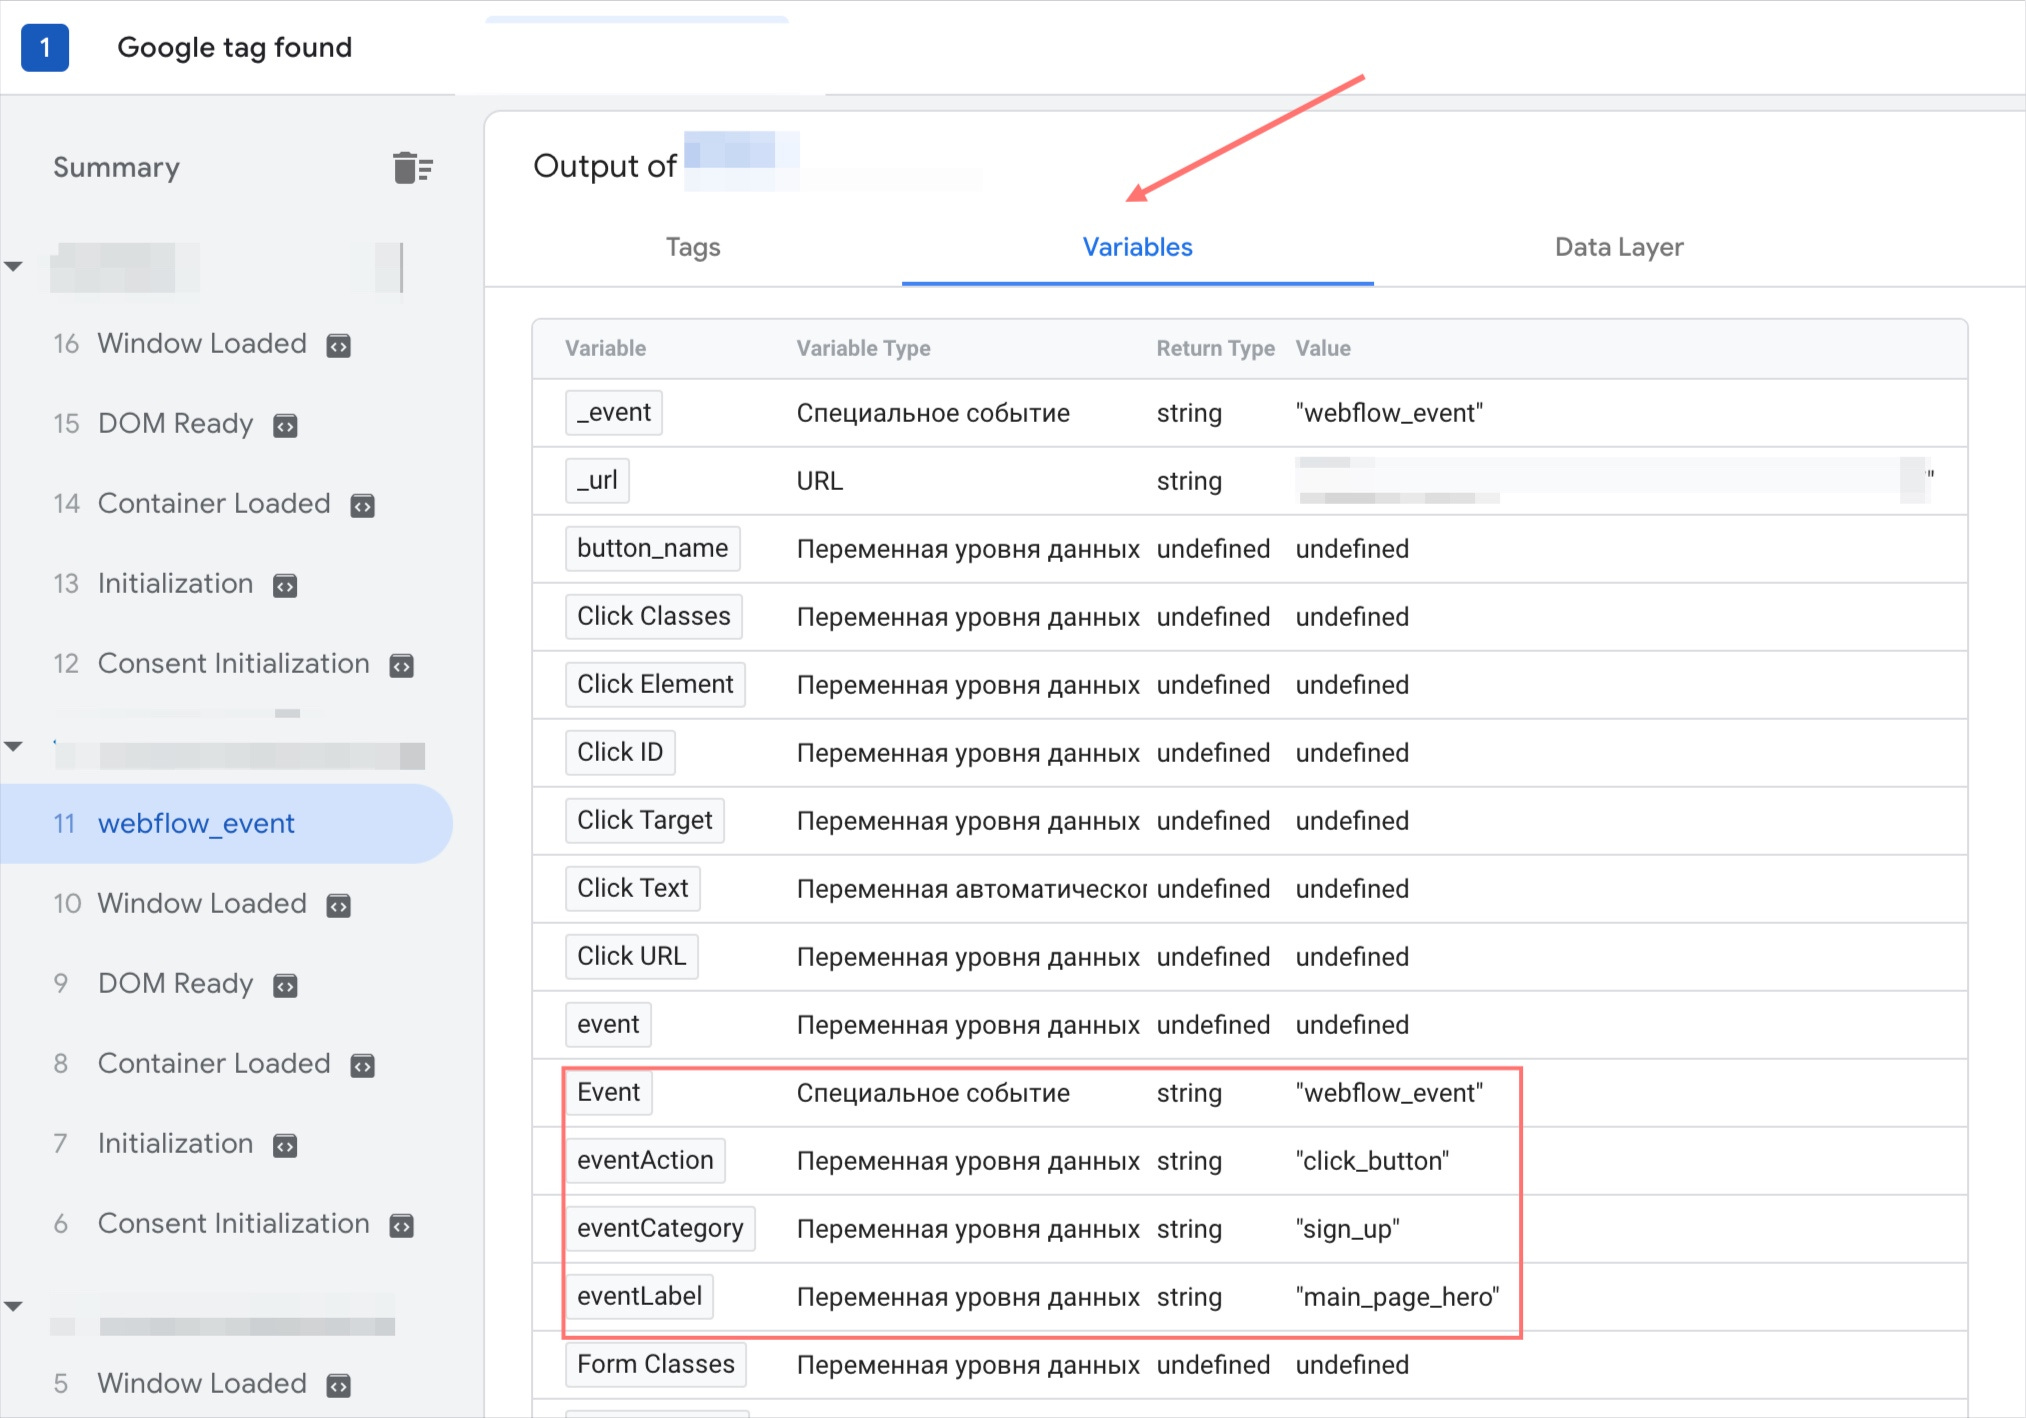
After that, find the event (e.g. webflow_event) in GTM debugger. "Variables" tab will show values of all event variables:
Once you're done, click "Publish" in GTM to apply the changes and add CSS class and custom attributes to all Webflow buttons you need.
Mistakes I've made here:
GTM variable name ≠ Webflow Custom Attribute Name
not added the GTM variable
not added class to button in Webflow
not added variable in code for event tracking: first with
var eventCategory = eventCategory, then in event JSONtracking wrong class name in
elementsToTrackfunction
Set up PostHog
Next step is setting up a PostHog instance. As mentioned above, you have 3 ways to do that:
self-hosting (GitHub repo): need your own machine and knowledge of running Docker files + limited features
PostHog Cloud: more features and no self-hosting but usage-based pricing
Buratto: everything available for self-hosting without pains of self-hosting
Once you're done, log into your PostHog. Wizard will give you installation instructions. You'll need to add a snippet to all pages on your website via GTM and send at least one event.
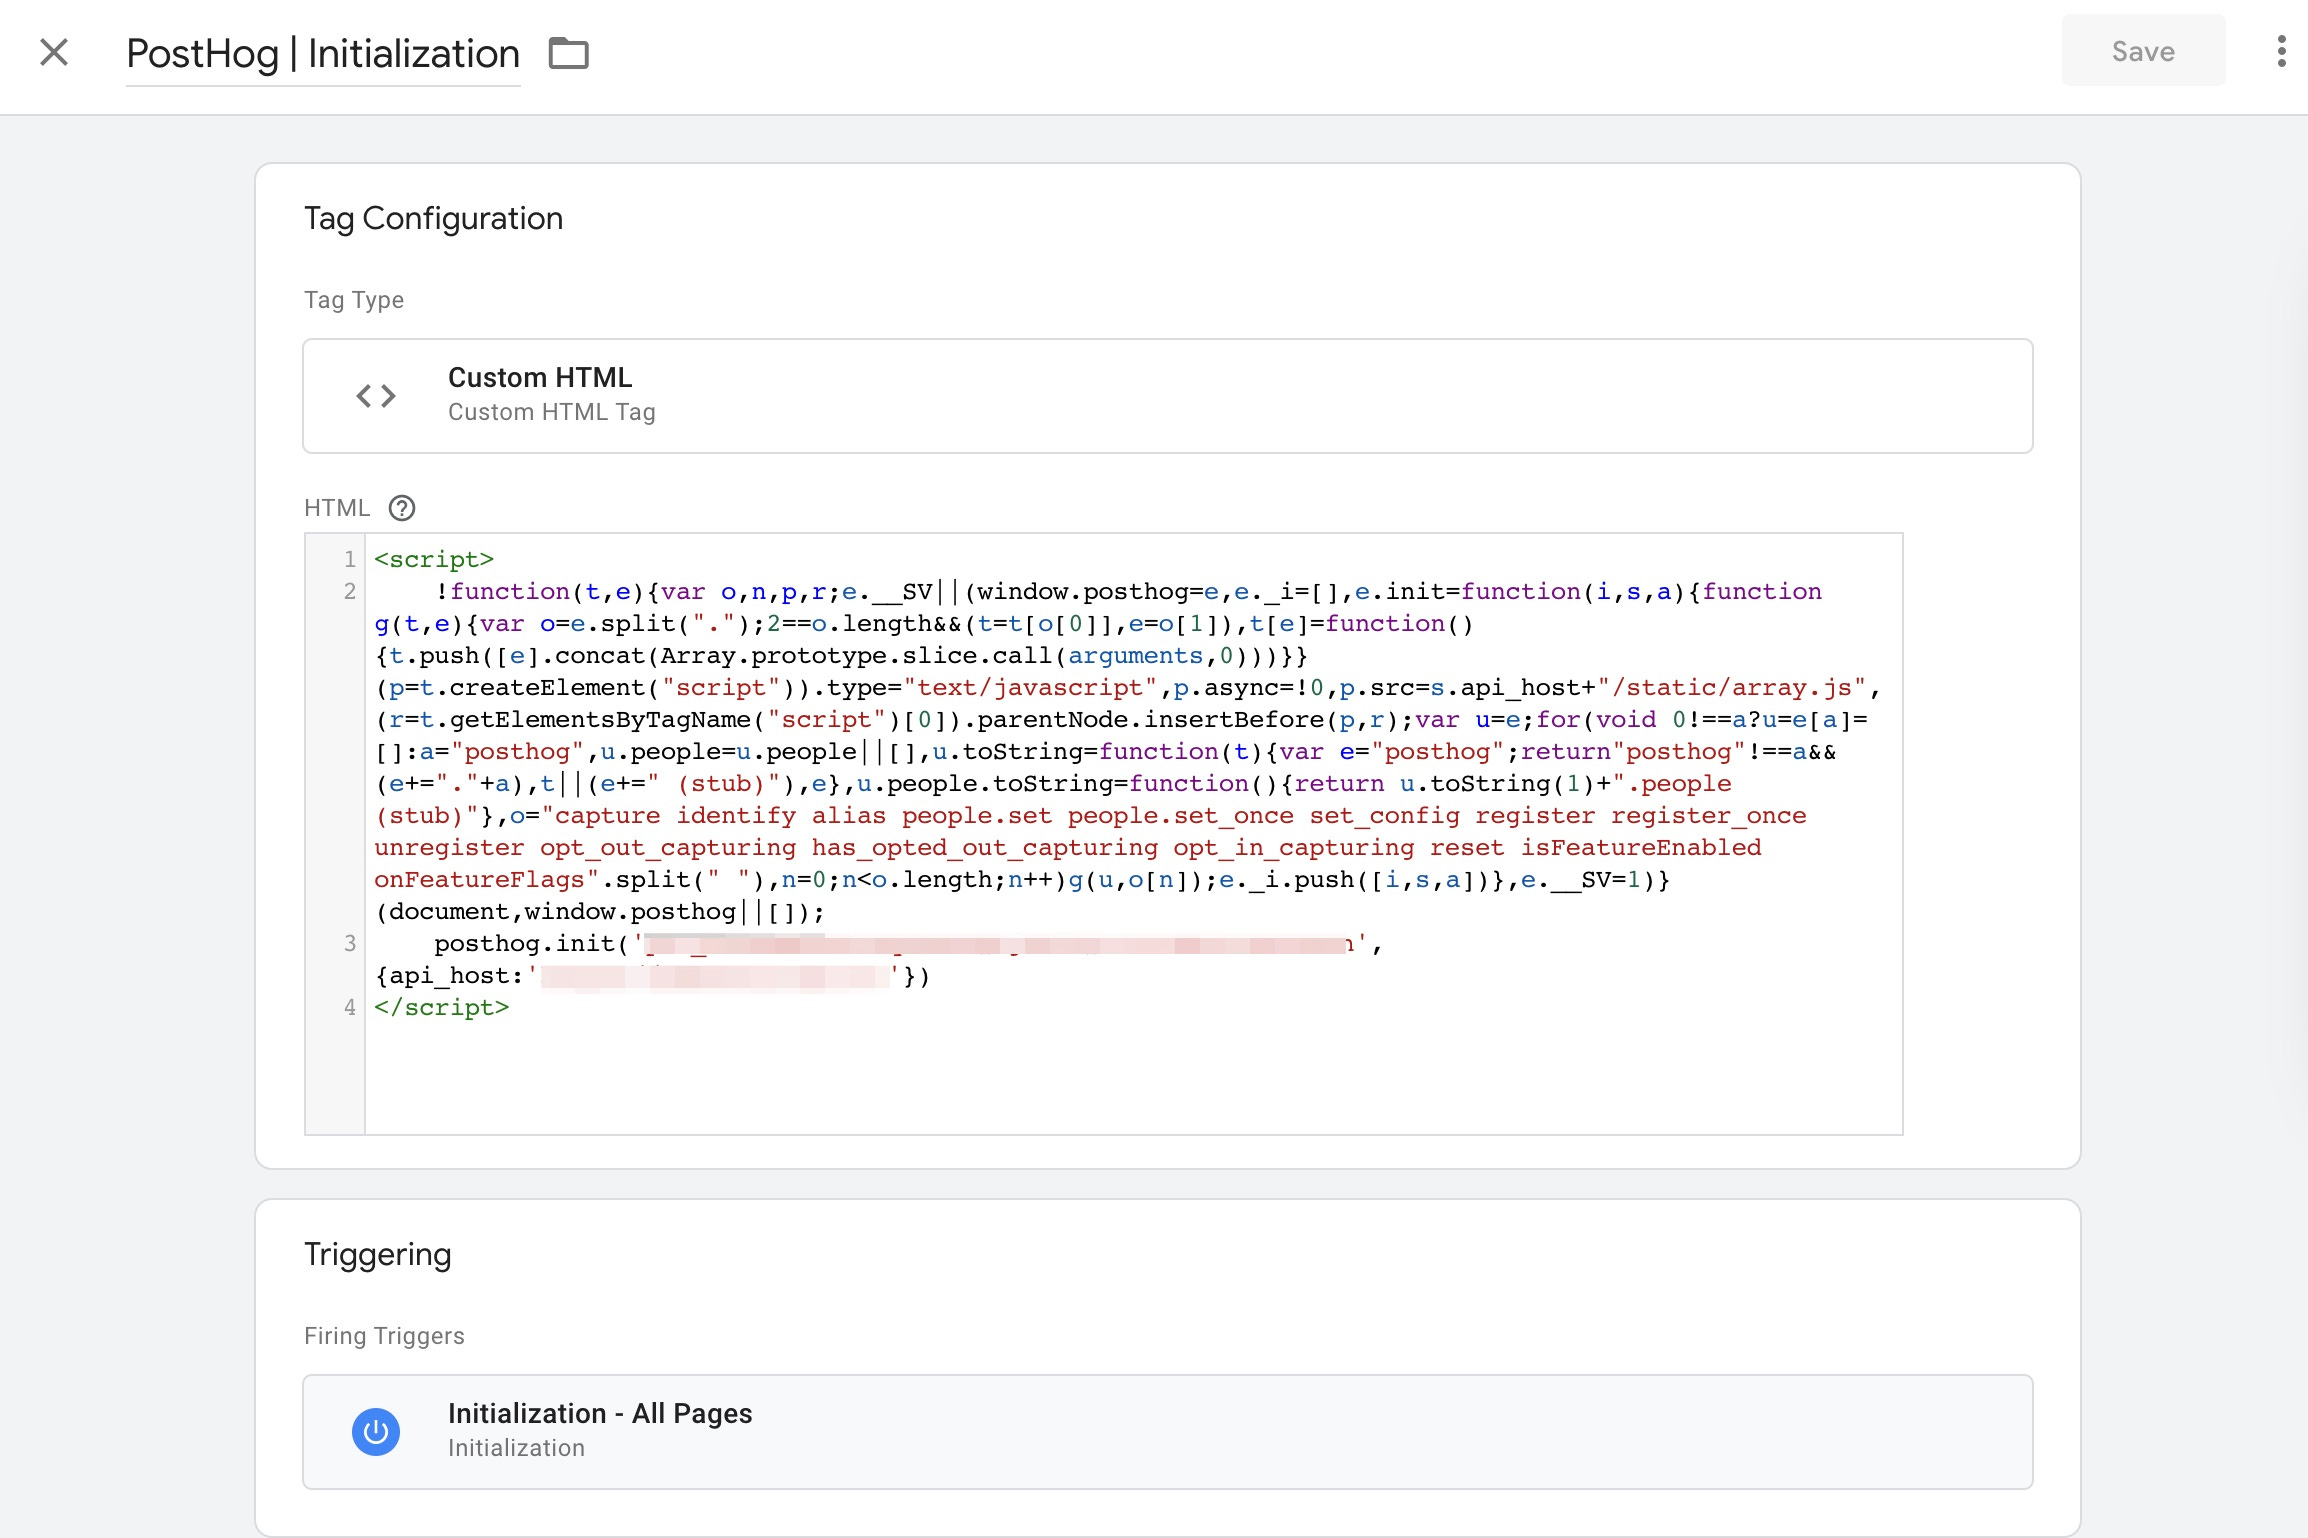
Add PostHog to GTM
Create a new "Custom HTML" tag in your Google Tag Manager and add a code snippet there:
<script>
    !function(t,e){var o,n,p,r;e.__SV||(window.posthog=e,e._i=[],e.init=function(i,s,a){function g(t,e){var o=e.split(".");2==o.length&&(t=t[o[0]],e=o[1]),t[e]=function(){t.push([e].concat(Array.prototype.slice.call(arguments,0)))}}(p=t.createElement("script")).type="text/javascript",p.async=!0,p.src=s.api_host+"/static/array.js",(r=t.getElementsByTagName("script")[0]).parentNode.insertBefore(p,r);var u=e;for(void 0!==a?u=e[a]=[]:a="posthog",u.people=u.people||[],u.toString=function(t){var e="posthog";return"posthog"!==a&&(e+="."+a),t||(e+=" (stub)"),e},u.people.toString=function(){return u.toString(1)+".people (stub)"},o="capture identify alias people.set people.set_once set_config register register_once unregister opt_out_capturing has_opted_out_capturing opt_in_capturing reset isFeatureEnabled onFeatureFlags".split(" "),n=0;n<o.length;n++)g(u,o[n]);e._i.push([i,s,a])},e.__SV=1)}(document,window.posthog||[]);
   posthog.init('your_API_token',{api_host:'your_posthog_instance_URL.com'})
</script>
Set "Initialization – All Pages" as trigger:
Test it with "Preview" mode by visiting several pages and checking that the tag fires there. At this point, you should start getting the first autocaptured events in your PostHog:
Once ready, publish new version of GTM container.
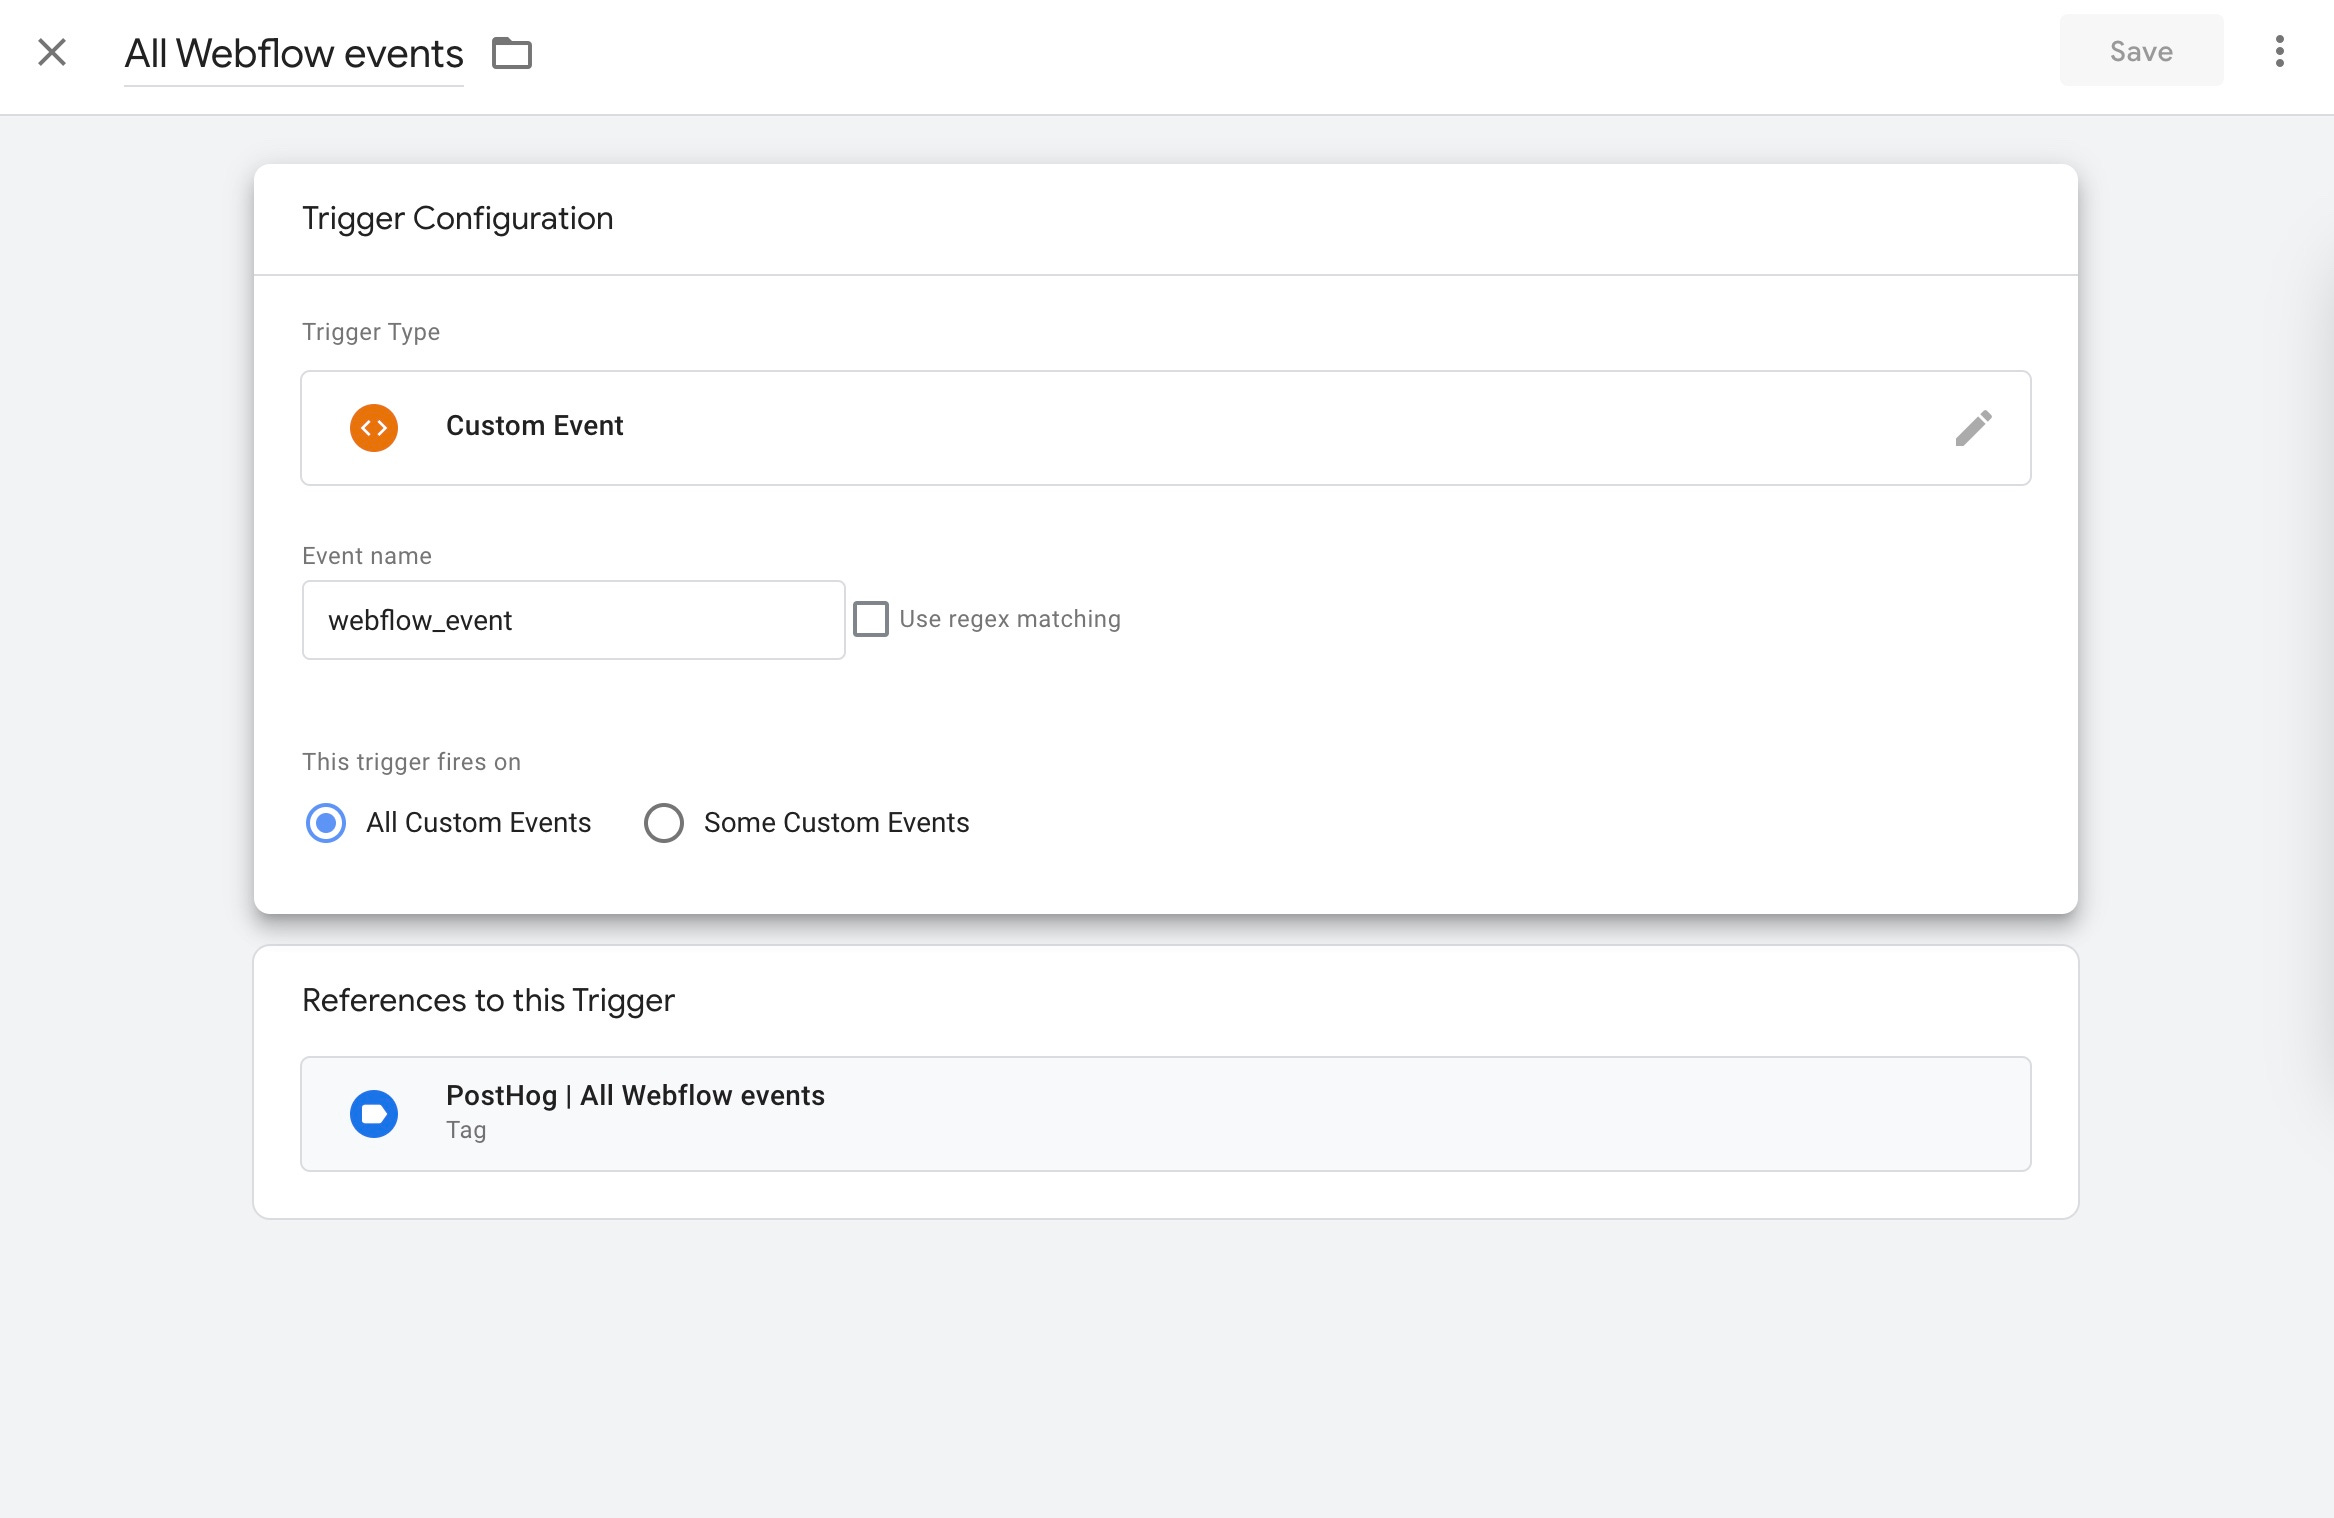
Send events to PostHog
All the work of previous steps will pay off now. Sending all events to PostHog will require just 1 (one) new trigger and 1 (one) new tag in GTM.
Add new "Custom Event" trigger. Put the event name you've chosen for the script (e.g. webflow_event) and use it as name. Then, select "All Custom Events" for firing and save it:
Add new "Custom HTML" tag and point it to the trigger you just created. Then, add this snippet to the code, save & test with "Preview":
<script>
  var eventLabel = {{eventLabel}};
  var eventAction = {{eventAction}};
  var eventCategory = {{eventCategory}};
  var event_name = eventLabel.concat(
      "_",
      eventAction,
      "_",
      eventCategory
      );
  posthog.capture(event_name,
        {
          domain: eventLabel,
          action: eventAction,
          goal: eventCategory
        }
  );
</script>
Now all the button clicks on your website are tracked in your PostHog and you can use them to build reports. This snippet names each PostHog event name from several GTM variables (e.g. main_landing_hero_sign_up or about_how_it_works_book_a_call) and sends all variables along as event properties.
It's especially valuable as different events can be combined in PostHog actions and/or sliced and diced using these event properties.
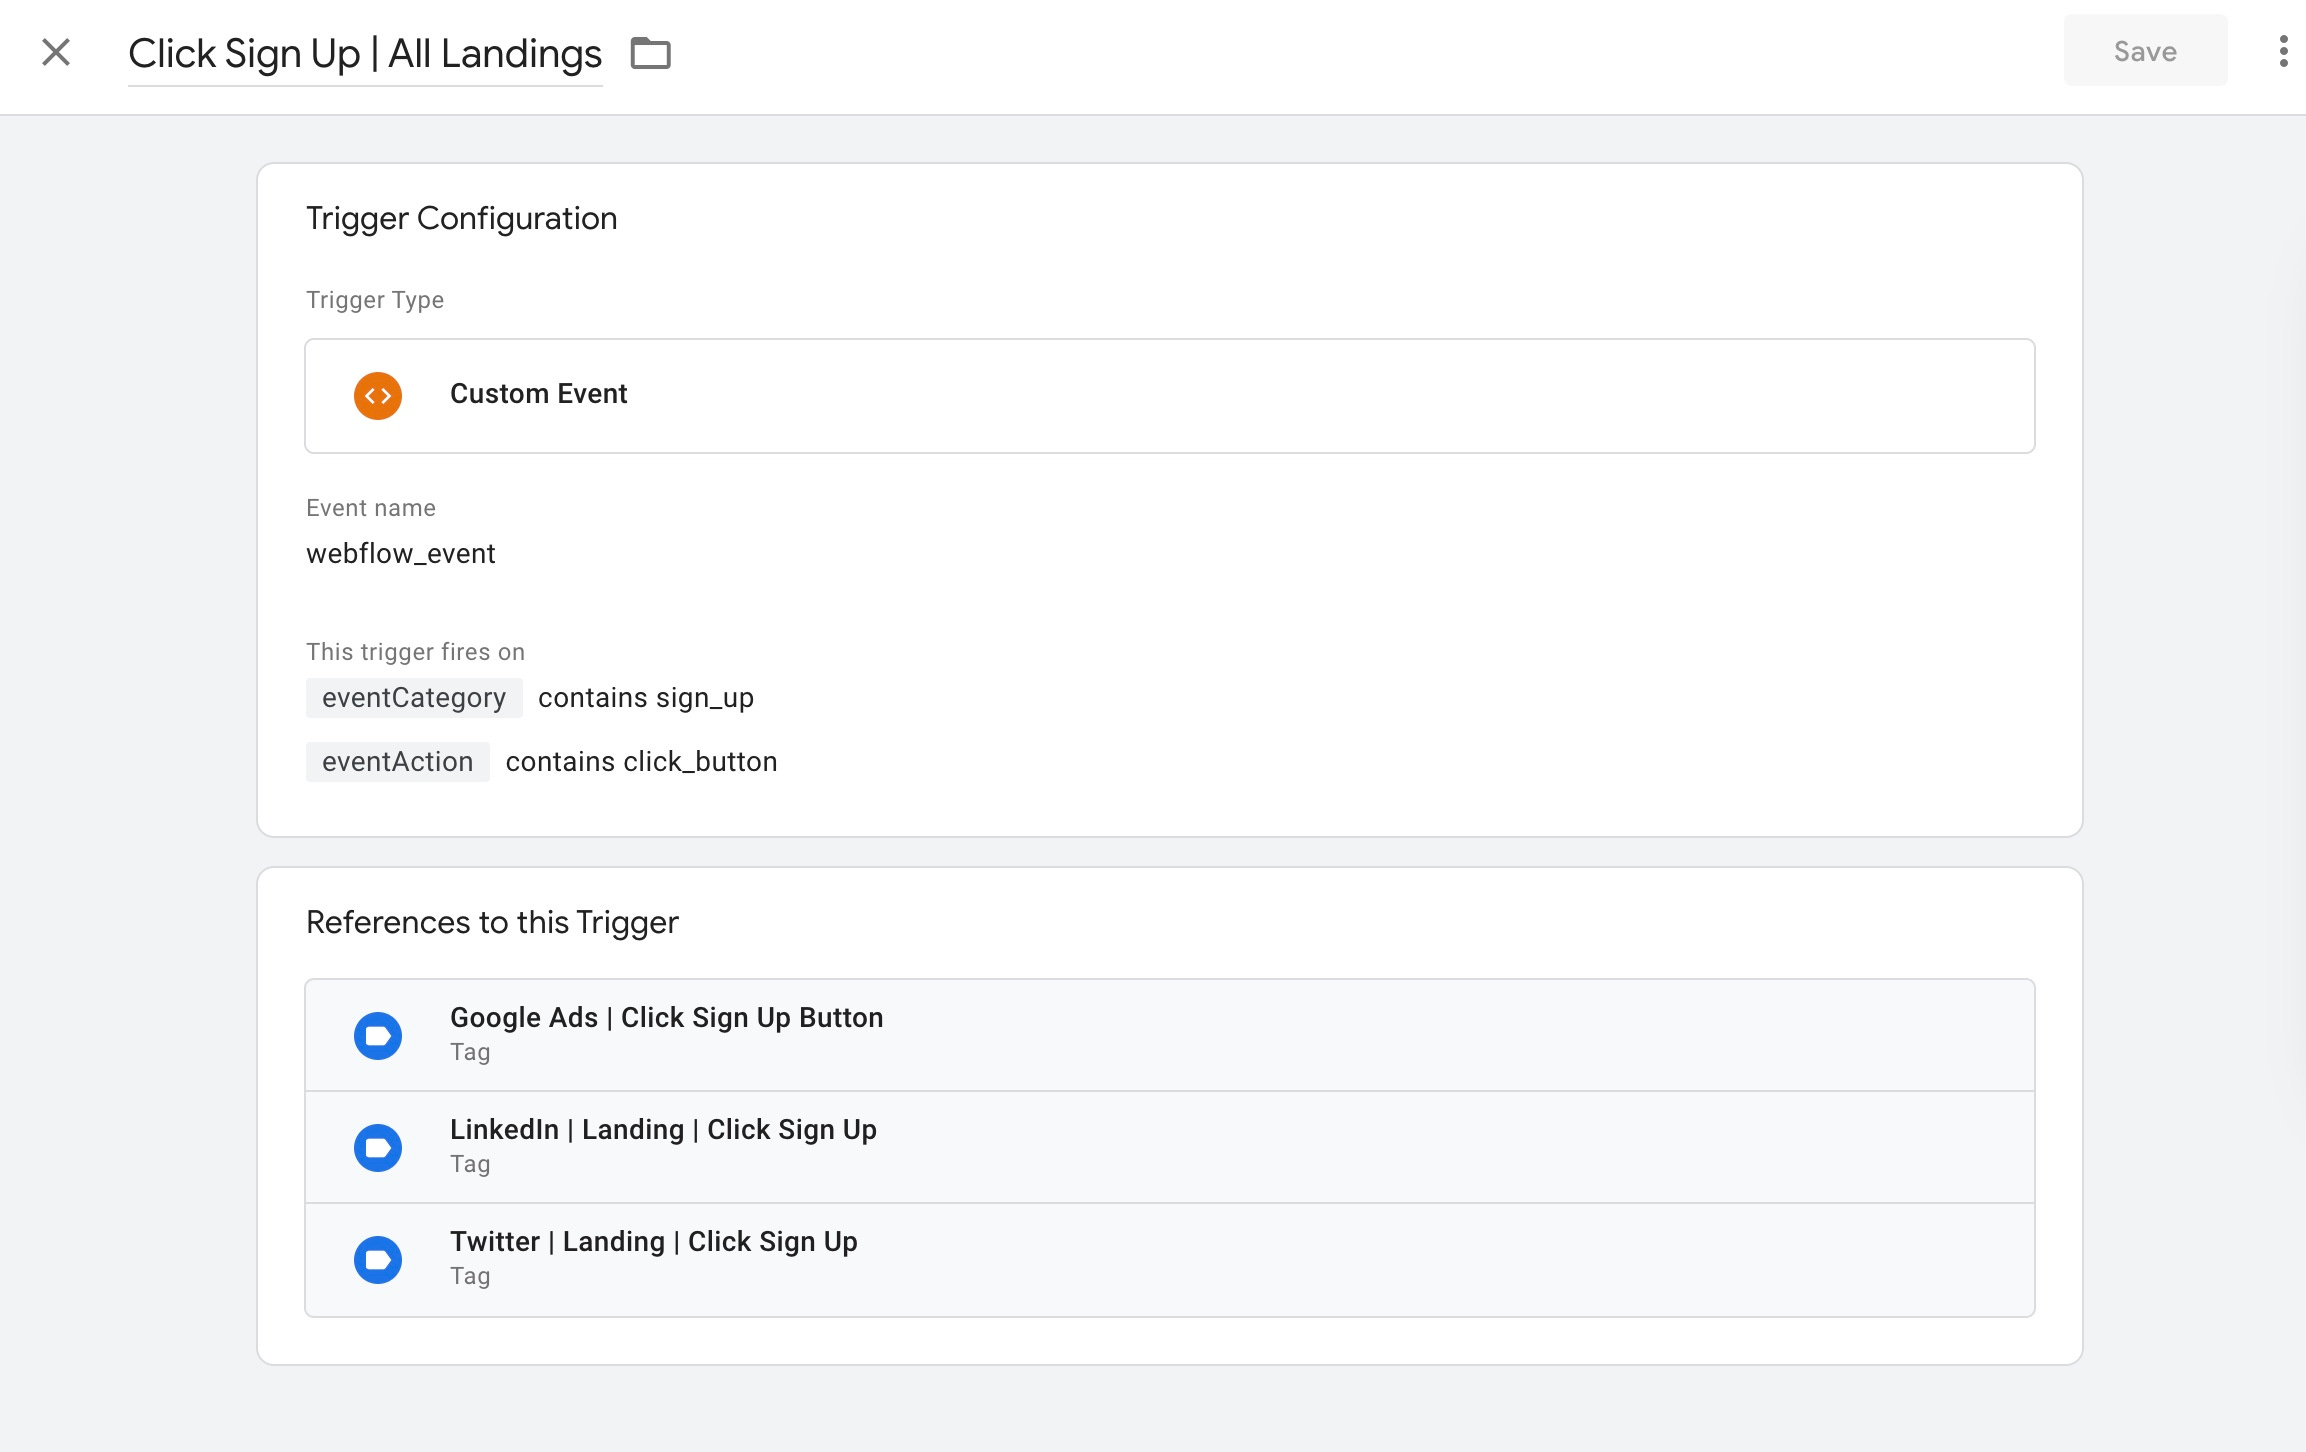
Send events to other systems
It gets even better when you need to send data to other systems like ad accounts. I like Twitter Ads and have 3 different actions that can happen with button types on my site:
signups
call bookings
new emails
All these buttons have different Custom Attributes. This way, I can filter them in Google Tag Manager and send clicks of all "Sign Up" buttons to Twitter as the same Twitter Conversion.
First, create Twitter pixel and add it to all pages, same as with PostHog instance initialization.
Second, create a new "Custom Event" trigger. This time, filter it with a variable:
Then, create Twitter Conversion in your ads account, paste the snippet you got in new "Custom HTML" tag and point it to the new trigger:

Test it the same way and publish new GTM container version. After that, all the events you've pointed to will be tracked as Twitter conversions.
Wrapping Up
I've found the work on this to be very rewarding. After the initial setup is done:
adding a new button of the same type takes literally a minute
adding new button or event type takes ~5 minutes
you have only several GTM tags and triggers – so less places where it can break down or you can forget to change stuff
there's still flexibility for PostHog analytics because of combination of Actions and event properties